
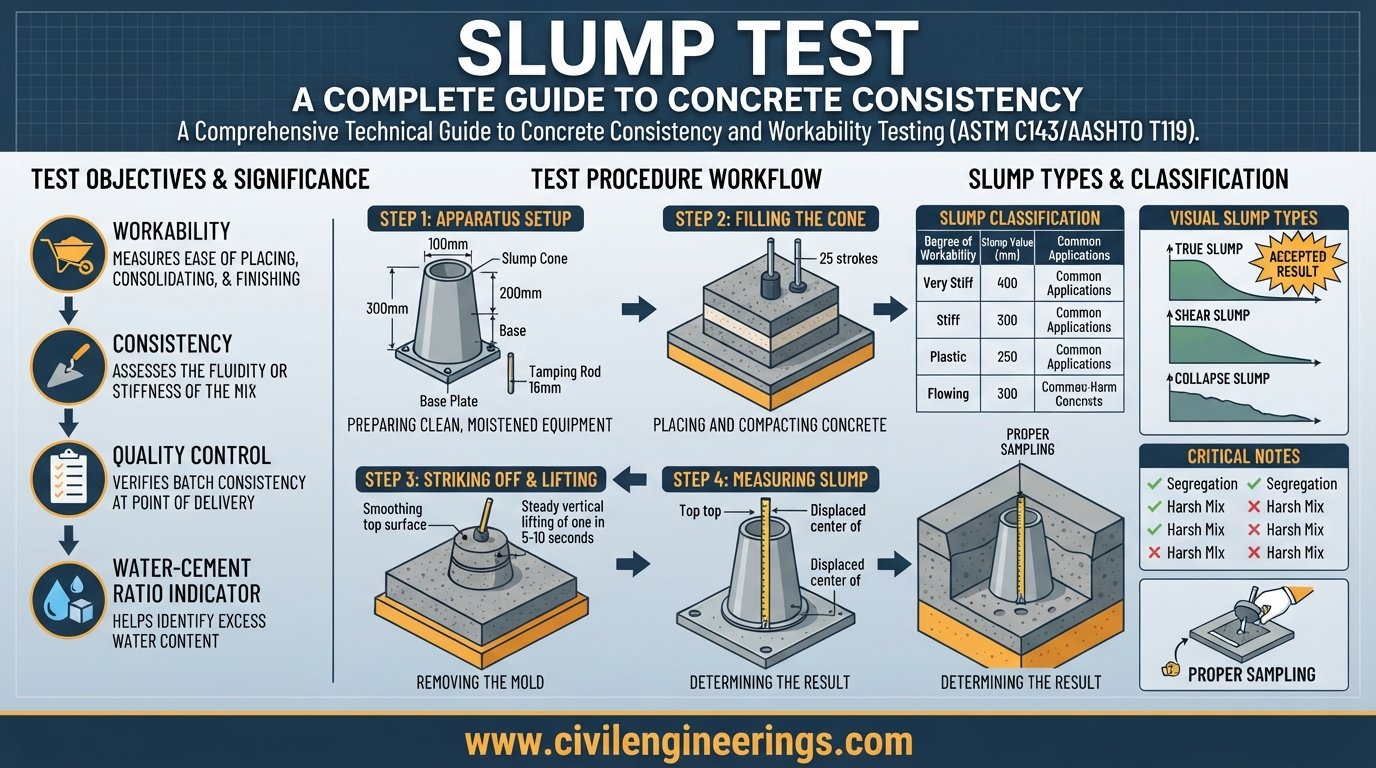
Fresh concrete can look perfectly acceptable while still having the wrong consistency for placement, compaction, and finishing. A mix that is too stiff may be difficult to place around reinforcement, while excessively fluid concrete can increase the risk of segregation, bleeding, and loss of quality. This is why the Slump Test remains one of the most practical quality-control tests performed on construction sites.
The Slump Test provides a rapid indication of the consistency of freshly mixed concrete by measuring how much the concrete subsides after a standard cone-shaped mould is removed. It is widely used in laboratories, batching plants, ready-mix operations, building projects, bridges, rigid pavements, and other infrastructure works. ASTM C143/C143M specifically covers determining the slump of plastic concrete in both laboratory and field conditions. (ASTM Store)
This guide explains the principle, apparatus, standard procedure, calculation, types of slump, interpretation of results, factors affecting slump, common mistakes, limitations, and practical quality-control recommendations. It also discusses the relationship between slump, workability, water content, admixtures, and concrete strength.
What Is the Slump Test?
The Slump Test is a simple field and laboratory test used to determine the consistency of freshly mixed concrete. In practical construction, it provides an indirect indication of the concrete’s workability and uniformity.
During the test, fresh concrete is placed inside a standard truncated-cone mould. The concrete is compacted according to the applicable testing standard. The mould is then lifted vertically, allowing the concrete to deform under its own weight.
The vertical reduction in height is called the slump.
In simple terms:
Slump = Original height of concrete − Height of slumped concrete
The result is normally expressed in millimetres (mm).
ASTM C143/C143M describes the method as applicable to plastic concrete and cautions that it is not suitable for non-plastic or non-cohesive concrete. ASTM also notes that field slump should not be treated as a direct and universally reliable predictor of concrete strength.
What Does Slump Actually Measure?
Slump primarily reflects the consistency of fresh concrete rather than strength itself.
It gives engineers useful information about:
- Ease of placement
- Relative workability
- Batch-to-batch uniformity
- Changes in water content
- Effects of chemical admixtures
- Concrete consistency before placing
- Potential production or mixing problems
The term “workability” is broader than slump. Workability includes how easily concrete can be mixed, transported, placed, compacted, and finished without segregation or excessive bleeding.
The Concrete Society similarly describes the slump test as a method for assessing the consistency of fresh concrete. (Concrete Society)


Principle of the Slump Test
The principle is straightforward.
A known quantity of fresh concrete is moulded into a standard cone. After removing the mould, gravity causes the unsupported concrete to settle. The amount of vertical settlement indicates the concrete’s consistency.
A low slump generally indicates a relatively stiff mixture, whereas a higher slump generally indicates a more fluid mixture. However, higher slump does not automatically mean better concrete.
The required slump depends on:
- Concrete placement method
- Reinforcement congestion
- Member geometry
- Aggregate characteristics
- Mix proportions
- Required compaction method
- Pumping requirements
- Specified project requirements
- Chemical admixture system
A properly designed concrete mix should achieve the specified consistency without relying on uncontrolled water addition at site.
Relationship Between Slump and Water Content
For a given concrete mixture under controlled conditions, increasing water content generally increases slump. ASTM specifically notes that laboratory slump tends to increase with water content, but warns that the relationship between field slump and concrete strength is not sufficiently consistent to use slump alone as a strength predictor. (ASTM Store)
This distinction is important.
Suppose a ready-mix truck arrives with a specified slump of 100 mm but the concrete appears too stiff. Adding water may increase the slump, but it also changes the designed water-cement ratio unless the mixture design and approved procedure specifically permit the adjustment.
A better solution may involve:
- Approved water adjustment procedures
- Water-reducing admixtures
- Superplasticizers
- Mix redesign
- Aggregate moisture correction
- Investigation of batching accuracy
Slump Test Apparatus
The apparatus is relatively simple, which is one reason this test is so popular.
Slump Cone
The main component is the slump cone, also known as the Abrams cone.
A conventional cone has approximately:
- Height: 300 mm
- Bottom diameter: 200 mm
- Top diameter: 100 mm
Equivalent inch-based dimensions are approximately 12 in high, 8 in at the base, and 4 in at the top.
ASTM C143/C143M specifies dimensional and procedural requirements, while other standards can have differences in equipment details or testing sequence. (ASTM Store)
Tamping Rod
A steel tamping rod is used to compact each layer of concrete.
The commonly specified rod is approximately:
- Diameter: 16 mm
- Length: about 600 mm
- Rounded or hemispherical end
The exact requirements should always follow the governing test standard for the project.
Base Plate
The cone should sit on a firm, level and non-absorbent surface.
A suitable base helps prevent:
- Movement of the cone
- Loss of mortar
- Uneven settlement
- Distortion of the test
Measuring Scale
A steel ruler or suitable measuring device is required to measure the vertical difference between the original mould height and the resulting concrete height.
Additional Equipment
A field testing setup may also require:
- Scoop
- Trowel
- Bucket or sampling container
- Cleaning brush
- Damp cloth
- Personal protective equipment
- Fresh concrete sampling equipment
Fresh cementitious materials can be caustic, so gloves, protective footwear, eye protection, and suitable site safety procedures are important. ASTM also explicitly warns about the chemical-burn hazard associated with fresh hydraulic cementitious mixtures. (ASTM Store)
Slump Test Procedure Step by Step
Correct technique matters as much as the equipment. A poor testing procedure can produce a misleading result even when the concrete itself is satisfactory.
Step 1: Prepare the Testing Area
Place the base plate on a firm, level, rigid and non-absorbent surface.
Moisten the cone and base where required by the governing standard, but remove standing water.
The testing location should be close enough to the concrete discharge point to minimize unnecessary delay.
Step 2: Collect a Representative Concrete Sample
The test should be performed on a representative sample of freshly mixed concrete.
Sampling is critical because a technically perfect slump test cannot compensate for an unrepresentative sample.
The concrete should be properly mixed before sampling. Avoid deliberately selecting only mortar-rich or aggregate-rich portions.
Step 3: Position the Slump Cone
Stand the cone firmly on the base plate.
Hold the cone securely so it does not move during filling and compaction.
Step 4: Fill the Cone in Layers
The standard procedure generally involves filling the mould in three approximately equal layers.
Each layer is compacted with the tamping rod according to the applicable standard.
Under the commonly used procedure, each layer receives 25 strokes, distributed uniformly across the cross-section.
The rod should penetrate appropriately into the underlying layer to help achieve consistent consolidation.
The Concrete Society describes a three-layer procedure with 25 strokes per layer under BS EN 12350-2. (Concrete Society)
Step 5: Strike Off the Top
After placing and compacting the final layer, maintain enough concrete above the mould to compensate for settlement during rodding.
Strike off the top surface so it is approximately level with the top of the cone.
Clean excess concrete from around the base.
Step 6: Lift the Cone
The cone is lifted vertically and carefully.
Avoid:
- Twisting
- Tilting
- Sideways movement
- Sudden jerking
The lifting action should allow the concrete to settle naturally.
Step 7: Measure the Slump
Place the cone beside the slumped concrete.
Measure the vertical difference between the original top level represented by the mould and the highest point of the displaced concrete mass, according to the applicable standard.
The measured difference is the slump value.
For example, if the original concrete height is 300 mm and the resulting height is 220 mm:
Slump = 300 − 220
Slump = 80 mm
Therefore, the concrete has an 80 mm slump under this example.


Types of Slump
The numerical value alone does not tell the complete story. The shape of the concrete after removing the cone must also be observed.
There are three commonly discussed forms.
True Slump
In a true slump, the concrete subsides relatively uniformly while retaining a recognizable shape.
This is the normal and useful form of slump for the conventional test.
A true slump indicates that the concrete has sufficient cohesion for the measurement to have practical meaning.
Shear Slump
A shear slump occurs when part of the concrete mass slips sideways rather than settling uniformly.
This may indicate:
- Poor cohesion
- Harsh mix
- Inadequate grading
- Improper testing technique
- Excessive aggregate effects
A shear result should not simply be accepted as an ordinary numerical slump.
The test should be repeated using a fresh sample in accordance with the applicable standard. ASTM C143/C143M addresses the limitations of the method for non-cohesive concrete. (ASTM Store)
Collapse Slump
A collapse slump occurs when the concrete loses its shape and spreads significantly.
This may occur with:
- Very fluid concrete
- High-workability concrete
- Excessive water
- Highly effective water-reducing admixtures
- Concrete for which the conventional slump test is not appropriate
The Concrete Society notes that collapse generally indicates concrete that is too fluid for the conventional slump measurement, with flow testing being more appropriate for highly workable mixtures. (Concrete Society)


Slump Test Formula and Calculation
The calculation is simple.
Basic Slump Formula
S = H₀ − H₁
Where:
- S = slump
- H₀ = original height of the concrete mould
- H₁ = height of the slumped concrete
For a conventional 300 mm high cone:
Example:
Original height = 300 mm
Height after slump = 245 mm
Therefore:
S = 300 − 245 = 55 mm
The reported slump is therefore 55 mm, subject to the measurement and reporting requirements of the applicable standard.
Why the Formula Is Not a Workability Equation
The formula only calculates vertical deformation.
It does not calculate:
- Compressive strength
- Tensile strength
- Elastic modulus
- Durability
- Water-cement ratio
- Cement content
Consequently, engineers should never use slump as a standalone substitute for concrete mix design or strength testing.
Typical Slump Ranges and Their Applications
There is no single “ideal slump” for every concrete application.
The specified value should come from the approved mix design, project specification, placement method, and governing standard.
As a practical engineering guide, relatively low-slump concrete may be suitable for applications where stiff consistency is required, while higher-slump concrete may be needed for congested reinforcement, pumping, or difficult placement.
Examples include:
- Low slump: pavements and other applications requiring relatively stiff concrete
- Moderate slump: foundations, footings, slabs and conventional reinforced concrete
- Higher slump: heavily reinforced members or concrete requiring improved placement
- Very high flow: specialized applications where slump-flow or another consistency test is more appropriate
These are illustrative categories rather than universal acceptance limits.
Always follow the project specification instead of adopting a generic internet table.
Factors Affecting Slump
Several factors can change slump without necessarily indicating poor concrete quality.
Water Content
An increase in free water normally increases slump.
However, uncontrolled water addition can increase the water-cement ratio and potentially reduce strength and durability.
Aggregate Shape and Texture
Rounded aggregates generally improve mobility compared with angular and highly rough particles.
Aggregate grading also affects paste demand and internal friction.
Aggregate Moisture
Changes in aggregate moisture can alter the amount of free water available in the mixture.
This is particularly important at batching plants.
Cement Characteristics
Changes in cement type, fineness, temperature, and interaction with admixtures can influence consistency.
Chemical Admixtures
Water reducers and superplasticizers can substantially increase slump without requiring a corresponding increase in mixing water.
This is one reason a high-slump concrete is not automatically a high-water concrete.
Concrete Temperature
Higher concrete temperature can accelerate hydration and may reduce measured consistency over time.
Mixing Time
Extended mixing, transportation, or delays before placement can change slump.
Time Since Mixing
Fresh concrete is not static.
Slump can decrease as hydration progresses, especially when concrete remains exposed to hot weather or prolonged transportation.
Slump Test Acceptance and Quality Control
A good site engineer should not ask only, “What is the slump?”
The better questions are:
- What slump was specified?
- What slump was measured?
- Was the sample representative?
- Was the test performed correctly?
- Was the concrete temperature acceptable?
- Was water added after batching?
- Were admixtures used?
- Was the result a true, shear, or collapse slump?
- Does the batch comply with the approved mix design?
- Is further investigation required?
Example of Field Interpretation
Suppose a project specifies a target slump of 100 mm.
Three truckloads produce:
- Truck A: 95 mm
- Truck B: 102 mm
- Truck C: 145 mm
The third result deserves investigation.
Possible causes include:
- Excess mixing water
- Aggregate moisture variation
- Incorrect batching
- Admixture dosage
- Delayed testing
- Sampling variation
The correct response is not automatically to reject the truck solely because the number looks high. The project specification and permitted tolerance should determine acceptance.
Common Slump Test Errors
Testing on an Uneven Surface
An unstable base can cause movement of the cone and distorted results.
Incorrect Layer Thickness
Unequal layers can produce inconsistent compaction.
Non-Uniform Rodding
If strokes are concentrated in one area, the concrete may compact unevenly.
Moving the Cone During Compaction
Even slight movement can alter the specimen.
Tilting the Cone During Removal
The cone should be lifted vertically rather than dragged or twisted.
Delaying Measurement
Fresh concrete continues to deform. Unnecessary delays can affect the result.
Adding Water Before Testing
Site personnel sometimes add water to “make the concrete workable” and then test the modified concrete.
This can invalidate the original quality-control purpose and may alter the approved mixture.
Ignoring Slump Shape
Recording only “80 mm slump” without noting an unusual shear or collapse pattern can hide an important quality issue.
Slump Test vs Workability
A common misconception is that slump equals workability.
It does not.
Slump is one practical indicator of fresh concrete consistency. Workability is a broader concept involving:
- Mobility
- Stability
- Compactability
- Pumpability
- Finishability
- Cohesion
- Resistance to segregation
Two concrete mixtures can have similar slump values but behave differently during pumping or vibration.
For example, one mixture may have good cohesion, while another may exhibit bleeding or segregation despite having the same measured slump.
Therefore, experienced engineers evaluate slump together with visual appearance, temperature, air content, density, mix records, and other quality-control observations.
Limitations of the Slump Test
The test is useful, but it is not universal.
ASTM C143/C143M identifies the method as intended for plastic concrete and notes limitations at very low and very high slump values. It states that concrete with slump below about 15 mm may not be sufficiently plastic, while very high slump, around 230 mm or more, may lack sufficient cohesion for meaningful conventional slump measurement. (ASTM Store)
The test also has limitations for:
- Self-consolidating concrete
- Extremely stiff concrete
- Non-cohesive concrete
- Concrete containing unusually large aggregate
- Mixtures requiring specialized rheological measurements
For highly flowable concrete, a slump-flow test or another appropriate test may provide more useful information.
ASTM, AASHTO, IRC and ICE References
Different countries and projects use different standards, so engineers should identify the governing specification before testing.
ASTM C143/C143M is the major ASTM method for determining slump of concrete and is applicable to laboratory and field testing of plastic concrete. ASTM’s current published listing shows C143/C143M as an active standard and provides specific scope and applicability limitations. (ASTM Store)
AASHTO T 119 is widely used in highway and transportation construction for determining concrete slump. Its traditional procedure also uses the familiar 12-inch-high slump cone and three-layer compaction approach.
For Indian road projects, engineers should consult the applicable Indian Roads Congress (IRC) documents together with the relevant Indian Standards and project specifications. IRC’s current publication information includes IRC:15-2017 among its listed publications, while current IRC work also includes concrete mix-design and rigid-pavement guidance. (Indian Railway Catering)
From an engineering-practice perspective, ICE technical guidance also recognizes concrete consistence/workability as an important property affected by factors such as water content and aggregate characteristics. (Institution of Civil Engineers (ICE))
The important principle is simple: use the exact test method and acceptance limits specified for the project rather than mixing procedures from different standards.
Practical Recommendations for Students, Engineers and Contractors
For Civil Engineering Students
Understand the principle rather than memorizing only “25 strokes.”
You should know:
- Why the cone has its shape
- What slump represents
- Difference between consistency and workability
- Three slump types
- Basic calculation
- Limitations of the test
- Relationship between water and slump
- Why slump does not directly determine strength
For Site Engineers
Always record:
- Date and time
- Concrete identification
- Truck or batch number
- Specified slump
- Measured slump
- Concrete temperature where required
- Slump type
- Water/admixture adjustments
- Test location
- Acceptance or rejection decision
Good documentation makes the test useful for both immediate quality control and later investigation.
For Contractors
Avoid unauthorized water addition.
If concrete is difficult to place, investigate the cause instead of automatically adding water.
Use approved admixtures and follow the concrete supplier’s and project engineer’s instructions.
Maintain clean, calibrated testing equipment and train technicians in consistent testing technique.
Frequently Asked Questions About the Slump Test
1. What is the main purpose of the Slump Test?
The main purpose is to determine the consistency of freshly mixed concrete and provide an indication of its relative workability and uniformity.
2. What is a normal slump value for concrete?
There is no universal normal value. The required slump depends on the structural element, mix design, reinforcement, placement method, pumping requirements, and project specification.
3. What does a higher slump indicate?
A higher slump generally indicates greater fluidity or consistency of fresh concrete. It does not automatically indicate better quality or lower strength.
4. Does higher slump mean lower concrete strength?
Not necessarily. Higher slump caused by uncontrolled additional water can increase the water-cement ratio and may reduce strength. However, admixtures can increase slump without adding equivalent water. ASTM therefore cautions against directly relating field slump to concrete strength. (ASTM Store)
5. What are the three types of slump?
The three commonly identified forms are true slump, shear slump, and collapse slump.
6. Which type of slump is considered useful?
A true slump is the normal useful result for conventional slump measurement. A shear slump should generally be investigated and retested according to the governing standard. A collapse may indicate that the concrete is too fluid for conventional slump testing.
7. How many strokes are used in the slump test?
Under commonly used procedures, each of three layers is compacted with 25 uniformly distributed strokes. However, technicians should always follow the exact governing standard because procedures can differ.
8. Can slump test determine compressive strength?
No. Slump is a fresh-concrete consistency test. Compressive strength requires appropriate hardened-concrete strength testing, such as cylinder or cube testing according to the applicable standard.
9. Why does concrete slump decrease with time?
Hydration, evaporation, temperature, transportation, and other time-dependent effects can reduce fresh concrete consistency.
10. Is the slump test suitable for self-compacting concrete?
Conventional slump measurement is generally not the preferred test for self-compacting concrete. A slump-flow test and other specialized fresh-concrete tests are more appropriate for highly flowable mixtures.
Conclusion
The Slump Test remains one of the most valuable routine quality-control tools in concrete construction because it is fast, economical, simple, and practical for field use. A correctly performed test can reveal changes in fresh concrete consistency before the material is placed into a structural element or pavement.
However, the number alone should never become the entire quality-control decision. Engineers must consider the specified slump, testing procedure, concrete temperature, mix proportions, admixtures, aggregate moisture, slump shape, and placement requirements. A true slump provides the most meaningful conventional result, while shear and collapse behavior require additional attention.
Most importantly, slump should not be confused with concrete strength. A satisfactory slump does not guarantee satisfactory compressive strength, durability, or long-term performance. Likewise, a high slump is not automatically a poor result when it has been achieved through an approved mix design and suitable admixture system.
For students, site engineers, contractors, consultants, and infrastructure professionals, mastering the Slump Test means understanding both the procedure and the engineering judgment behind the result.

Kamran Malik is a passionate civil engineering writer and researcher who specializes in construction, transportation, structural engineering, and infrastructure topics. Through his articles on CivilEngineerings.com, he simplifies complex engineering concepts and shares practical insights, industry trends, and educational resources for students, professionals, and engineering enthusiasts.