
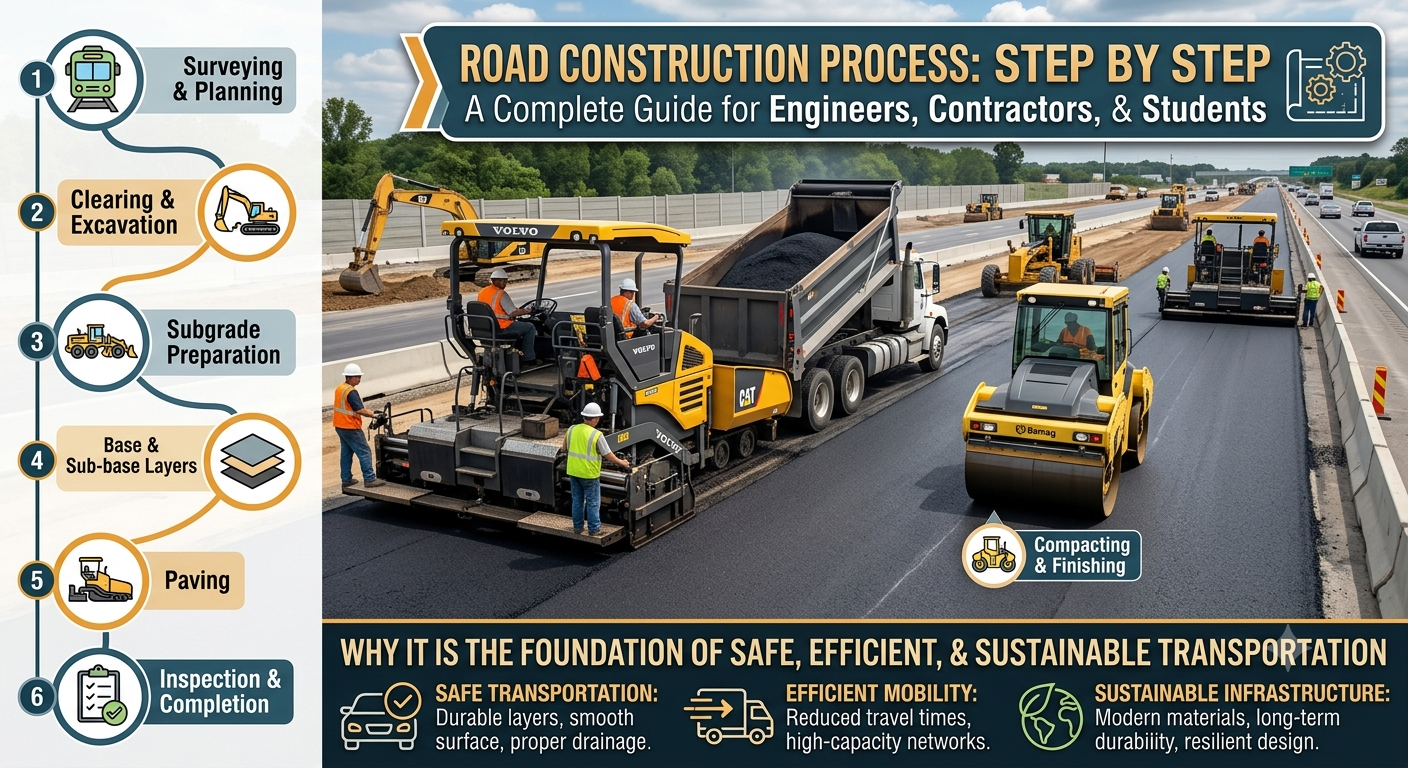
A finished road may look like a simple strip of asphalt, but beneath that smooth surface lies a carefully engineered system of soil, aggregate, drainage, pavement layers, and safety features. Every stage has a purpose, and a mistake in one activity can create expensive problems later.
The Road Construction Process begins long before construction equipment reaches the site. Engineers first study traffic demand, soil conditions, terrain, drainage, materials, utilities, environmental constraints, and the proposed alignment. The design is then converted into drawings, specifications, quantities, and a practical construction sequence.
For civil engineering students, site engineers, contractors, consultants, and infrastructure professionals, understanding this sequence is essential. It explains not only how roads are built but also why each activity matters.
This guide follows a typical road project from planning and surveying through earthworks, subgrade preparation, drainage, pavement construction, asphalt paving, quality control, finishing, and final inspection. The exact sequence and specifications vary according to pavement type, traffic loading, climate, soil, terrain, and the governing project standards.
What Is the Road Construction Process?


The Road Construction Process is the planned sequence of engineering, construction, testing, and finishing activities used to transform an approved road design into a functional transportation facility.
A typical flexible pavement project may progress through these broad stages:
- Planning and project investigation
- Surveying and setting out
- Site clearance and preparation
- Earthwork and formation construction
- Subgrade preparation
- Drainage and cross-drainage works
- Sub-base construction
- Base-course construction
- Prime coat and tack coat, where specified
- Asphalt production and paving
- Compaction and quality control
- Shoulders, road furniture, markings, and landscaping
- Testing, inspection, commissioning, and handover
Not every project follows exactly the same sequence. For example, drainage structures may be constructed alongside earthworks rather than after them. Bridges and culverts may also proceed concurrently with pavement activities.
The central engineering principle is straightforward: each layer must provide the required support, geometry, drainage, and durability before the next layer is placed.
Stage 1: Project Planning and Preliminary Investigation
Before construction starts, the project team needs to understand what is being built, where it will be built, and what conditions will affect its performance.
Traffic and Transportation Assessment
Engineers estimate present and future traffic. The assessment may include:
- Average daily traffic
- Commercial vehicle percentage
- Axle loading
- Traffic growth
- Design-life traffic
- Lane distribution
- Peak-hour demand
- Speed requirements
Heavy vehicles are particularly important for pavement design because repeated axle loading can cause fatigue, rutting, and permanent deformation.
Topographic and Site Investigation
Survey teams collect information about:
- Existing ground levels
- Natural drainage
- Buildings and structures
- Rivers and streams
- Existing roads
- Property boundaries
- Utilities
- Terrain features
Geotechnical investigation identifies soil type, groundwater conditions, bearing characteristics, moisture sensitivity, and potentially problematic materials.
Material Investigation
Potential sources of aggregates, embankment soil, sand, bitumen, cement, and other construction materials are investigated.
A material source should not be accepted simply because it is nearby. Laboratory testing determines whether the material satisfies the project requirements.
Stage 2: Surveying and Setting Out
Once the design has been approved, surveyors transfer the engineering information from drawings to the ground.
Establishing Control Points
Permanent or temporary control points provide reliable horizontal and vertical references.
The survey team establishes:
- Centerline
- Chainages or stationing
- Right-of-way limits
- Formation levels
- Cross-section locations
- Curves
- Road edges
- Drainage locations
- Structure positions
Modern projects may use total stations, GNSS/GPS equipment, digital levels, drones, and machine-control systems.
Why Accurate Setting Out Matters
A small error in elevation can influence drainage, pavement thickness, earthwork quantities, and connection with adjacent roads.
For example, the longitudinal grade can be represented as:
Where:
- = gradient in percent
- = difference in elevation
- = horizontal distance
The design team must verify that the constructed grade matches the approved profile.
Stage 3: Site Clearance and Preparation
After setting out, the construction area is prepared.
Clearing and Grubbing
Vegetation, debris, unsuitable surface materials, abandoned structures, and other obstructions are removed according to the contract requirements.
Trees and environmentally sensitive areas should not be cleared indiscriminately. Construction limits need to be clearly identified.
Removal of Unsuitable Material
Organic soil, highly compressible material, rubbish, peat, or other unsuitable material may need to be excavated and replaced.
The depth of removal should come from investigation and engineering judgment rather than guesswork.
Temporary Access and Construction Traffic
The contractor also establishes:
- Site access
- Haul roads
- Material storage areas
- Equipment parking
- Drainage arrangements
- Worker facilities
- Traffic-control zones
Good site logistics can significantly reduce equipment idle time and material-handling delays.
Stage 4: Earthwork and Formation Construction
Earthwork is one of the most important stages because it establishes the foundation on which the pavement will eventually rest.
Excavation and Embankment
Road earthworks generally involve cut and fill.
In cut sections, material is excavated to reach the required formation level. In fill sections, approved soil is placed in controlled layers to construct the embankment.
Heavy equipment may include:
- Excavators
- Bulldozers
- Motor graders
- Dump trucks
- Water tankers
- Vibratory rollers
- Sheep-foot or padfoot rollers
Layer-by-Layer Compaction
Embankment material should be placed in controlled lifts rather than dumped in one thick layer.
Moisture content strongly influences compaction. Too much water can reduce soil strength, while insufficient moisture may prevent effective densification.
Field density testing is commonly used to verify compaction against the specified requirement.
A basic relationship is:
The actual acceptance requirement depends on the project specification and material.
Stage 5: Subgrade Preparation
The subgrade is the prepared upper portion of the earthwork that supports the pavement structure.
It is one of the most critical components of road construction.
Subgrade Construction
The usual activities include:
- Trimming to the required line and level
- Moisture conditioning
- Scarifying where necessary
- Mixing or stabilization when specified
- Grading
- Compaction
- Proof rolling
- Correcting weak areas
The finished subgrade must achieve the specified elevation, crossfall, smoothness, and strength.
Dealing With Weak Subgrade
Weak zones may appear during proof rolling or field investigation. Depending on the cause, engineers may specify:
- Undercutting and replacement
- Lime stabilization
- Cement stabilization
- Mechanical stabilization
- Geosynthetics
- Improved drainage
- Imported selected material
A common mistake is to place thicker pavement over a fundamentally unstable formation without addressing the actual cause.
Stage 6: Drainage and Cross-Drainage Works
Water is one of the major threats to pavement performance. A good pavement structure can deteriorate rapidly if water remains trapped in the subgrade or pavement layers.
Road Drainage Components
Depending on the project, drainage may include:
- Side drains
- Catch drains
- Median drains
- Culverts
- Pipe drains
- Inlets
- Outfalls
- Kerb and channel systems
- Subsurface drainage
Drainage structures must be coordinated with the road profile.
Culverts and Cross-Drainage
Where natural watercourses cross the roadway, culverts or bridges may be required.
Construction typically involves excavation, foundation preparation, structure installation or construction, backfilling, and protection works.
The hydraulic design should consider factors such as catchment area, rainfall intensity, runoff, hydraulic capacity, debris, and downstream conditions.
Practical rule: Never treat drainage as an afterthought. Pavement and drainage should be considered as one integrated system.
Stage 7: Sub-Base Construction
The sub-base is placed above the prepared subgrade when required by the pavement design.
Common materials include graded aggregates, granular materials, or stabilized materials.
Sub-Base Construction Sequence
A typical operation is:
- Material approval
- Transportation
- Spreading
- Watering or moisture adjustment
- Grading
- Compaction
- Level checking
- Thickness verification
- Density testing
The material is generally placed in controlled layers so that the specified density can be achieved throughout its depth.
The sub-base can contribute to structural support, drainage, separation, frost protection in applicable climates, and provision of a stable working platform.
Stage 8: Base-Course Construction
The base course is a major structural layer of the pavement.
High-quality crushed aggregate, treated material, or another specified base material may be used depending on pavement design.
Base-Course Quality Requirements
Engineers commonly pay attention to:
- Aggregate gradation
- Particle shape
- Strength
- Cleanliness
- Plasticity
- Moisture
- Layer thickness
- Compaction
- Surface tolerance
The base should be compacted uniformly. Isolated soft areas should be repaired before asphalt placement.
Why Base Preparation Matters
A weak or poorly compacted base can result in:
- Rutting
- Settlement
- Cracking
- Uneven pavement
- Loss of ride quality
- Premature maintenance
The asphalt surface cannot reliably compensate for poor structural support underneath.
Stage 9: Prime Coat and Tack Coat
These treatments are often confused, but they have different functions and their use depends on the pavement system and project specification.
Prime Coat
A prime coat may be applied over a prepared granular base when specified. Its purpose can include penetrating and binding the upper portion of the granular surface and preparing it for subsequent bituminous layers.
Application rate and curing requirements should come directly from the project specification and material supplier requirements.
Tack Coat
A tack coat is used to promote bonding between existing or underlying bituminous surfaces and a new asphalt layer.
The surface must be clean and suitably prepared before application.
Poor tack-coat practice can contribute to slippage, delamination, and premature pavement distress.
Stage 10: Asphalt Production and Transportation
For an asphalt pavement, aggregate and binder are combined in an asphalt mixing plant.
Asphalt Mix Production
The plant controls:
- Aggregate proportions
- Aggregate heating
- Binder quantity
- Mixing temperature
- Moisture
- Production rate
- Mix consistency
The approved job mix formula or mix design determines the required composition.
The exact temperature ranges should always come from the approved mix design, binder requirements, plant procedures, and governing specifications rather than from a universal number.
Transportation to Site
Asphalt trucks transport the mixture from the plant to the paving location.
The logistics must be coordinated carefully. Excessive hauling time, traffic delays, unsuitable weather, or poor truck scheduling can reduce paving efficiency and affect compaction.
A good paving operation therefore requires coordination between:
Asphalt plant → haul trucks → paver → rollers → inspection team
If one part of this chain stops, the entire operation can be affected.
Stage 11: Asphalt Paving
The asphalt paver places the hot mix to the required width, thickness, profile, and crossfall.
Paver Operation
The paving team monitors:
- Mix temperature
- Paving speed
- Layer thickness
- Alignment
- Crossfall
- Surface texture
- Longitudinal joints
- Transverse joints
Consistent paver speed is generally desirable because frequent stopping and starting can make it more difficult to maintain uniformity.
Asphalt Layer Structure
A flexible pavement may contain several bituminous courses, depending on the design.
These can include:
- Asphalt base
- Binder course
- Wearing or surface course
The names and layer arrangement vary between specifications and pavement designs.
The surface course provides the final riding surface and must meet requirements for smoothness, skid resistance, durability, texture, and appearance.
Stage 12: Asphalt Compaction
Compaction is not simply “rolling the asphalt.” It is a controlled process that must achieve the required density without damaging the mixture or creating surface defects.
Main Rolling Stages
A typical paving operation may use:
- Breakdown rolling
- Intermediate rolling
- Finish rolling
Different roller types may be used depending on the mixture and construction method.
Compaction Window
Asphalt must be compacted while its temperature and workability remain suitable.
Important variables include:
- Mix temperature
- Ambient temperature
- Layer thickness
- Wind
- Surface temperature
- Roller type
- Roller speed
- Number of passes
- Mix properties
The optimum rolling pattern should be established through the approved construction procedure and, where required, a trial or test section.
Common Compaction Problems
Poor compaction may cause:
- High air voids
- Water penetration
- Reduced durability
- Rutting
- Ravelling
- Premature cracking
Excessive or poorly controlled rolling can also create problems. The objective is specified density and uniformity, not simply maximum rolling.
Stage 13: Quality Control and Testing
Quality control runs throughout the entire project.
Soil and Earthwork Tests
Depending on specifications, testing may include:
- Moisture content
- Grain-size distribution
- Atterberg limits
- Proctor compaction
- Field density
- CBR
- In-situ strength tests
Aggregate Tests
Typical aggregate evaluation can include:
- Gradation
- Aggregate crushing value or equivalent strength test
- Abrasion resistance
- Soundness
- Flakiness and elongation
- Water absorption
- Specific gravity
The exact test suite depends on the material and governing specification.
Asphalt Tests
Asphalt quality control can involve:
- Aggregate gradation
- Binder content
- Mix temperature
- Density
- Air voids
- Thickness
- Smoothness
- Core testing
- Surface characteristics
Testing should be performed according to the approved quality plan and applicable standards.
Stage 14: Road Shoulders, Kerbs, Safety Features, and Finishing Works
Once the pavement is substantially complete, finishing activities bring the road into its intended operational condition.
Shoulders
Shoulders may be constructed from granular material, asphalt, concrete, or another specified system.
They support pavement edges, provide recovery space, and may assist maintenance and emergency operations.
Road Furniture
Depending on the road classification, finishing works may include:
- Traffic signs
- Guardrails
- Delineators
- Kilometer posts
- Kerbs
- Road studs
- Safety barriers
- Street lighting
- Pedestrian facilities
Pavement Markings
Lane lines, edge lines, arrows, symbols, stop lines, pedestrian crossings, and other markings are applied according to the approved traffic-management design.
Visibility, durability, retroreflectivity, and correct positioning are important.
Stage 15: Final Inspection, Testing, and Handover
A road should not be opened simply because paving is finished.
The project team performs a final inspection against drawings, specifications, quality records, and contractual requirements.
Final Checks
Typical checks include:
- Alignment
- Pavement width
- Levels
- Crossfall
- Surface smoothness
- Pavement thickness
- Drainage
- Culverts
- Shoulders
- Road markings
- Signs
- Safety barriers
- Junctions
- Access roads
- Defects and unfinished works
As-built drawings and quality documentation should also be completed.
The handover process may include a defects-liability or maintenance period, depending on the contract.
Road Construction Equipment Used on Site
The equipment selection depends on project size, terrain, material, production requirements, and construction method.
Common equipment includes:
| Equipment | Main Function |
|---|---|
| Excavator | Excavation and material handling |
| Bulldozer | Clearing, spreading, and earthmoving |
| Motor grader | Grading and profile control |
| Dump truck | Hauling soil and aggregates |
| Water tanker | Moisture conditioning and dust control |
| Sheep-foot roller | Compaction of suitable cohesive soils |
| Vibratory roller | Compaction of granular and asphalt materials |
| Pneumatic roller | Asphalt compaction and kneading |
| Asphalt paver | Controlled placement of asphalt |
| Milling machine | Removal of existing pavement |
| Asphalt plant | Production of asphalt mixture |
| Total station/GNSS | Surveying and setting out |
Efficient equipment management is as important as equipment availability. A modern paver cannot maintain productivity if trucks arrive irregularly.
Engineering Principles That Control Road Performance
The Road Construction Process should always be connected to pavement performance.
Load Distribution
Traffic loads are transferred through the pavement layers toward the subgrade. Each layer reduces the stress reaching the layer below.
Drainage
Water should be prevented from accumulating within pavement layers and the subgrade.
Compaction
Proper density reduces excessive deformation and improves material performance.
Geometry
Horizontal alignment, vertical profile, crossfall, sight distance, and superelevation influence safety and drainage.
Material Compatibility
Materials should satisfy the requirements for their intended function. A material suitable for an embankment may not necessarily be suitable for a high-quality pavement base.
Practical Recommendations for Students, Engineers, and Contractors
For Civil Engineering Students
Do not learn road construction only from diagrams. Visit construction sites and observe the sequence physically.
Learn to identify:
- Formation level
- Subgrade
- Sub-base
- Base course
- Prime coat
- Tack coat
- Binder course
- Wearing course
- Drainage structures
Also practice reading cross-sections, longitudinal profiles, quantity sheets, and test reports.
For Site Engineers
Maintain a clear inspection sequence.
Before approving the next layer, verify:
- Previous layer thickness
- Levels
- Crossfall
- Compaction
- Material approval
- Surface condition
- Test results
- Drainage details
Never allow production pressure to replace engineering judgment.
For Contractors
Plan the entire paving chain before starting.
Check the availability of:
- Approved materials
- Plant capacity
- Trucks
- Paver
- Rollers
- Survey support
- Testing laboratory
- Skilled operators
- Traffic management
A productive site is not necessarily the one with the most machines. It is the one where the machines, people, materials, and inspections work together efficiently.
IRC, AASHTO, and ICE: Why Standards Matter
Road construction specifications vary by country, authority, pavement type, and project contract. Engineers should therefore avoid treating one specification as universally applicable.
In India and projects using Indian practice, the Indian Roads Congress (IRC) develops and updates codes, standards, and guidelines covering roads, traffic, transportation, maintenance, flexible and rigid pavements, drainage, road safety, and related areas. (Indian Register of Companies)
For projects following American highway practice, AASHTO publishes standards covering transportation materials, testing, pavement engineering, and highway construction. Its 2026 materials standards collection includes new and revised testing and construction-related provisions. (AASHTO Store)
AASHTO’s pavement guidance also treats pavement design, construction, management, preservation, safety, and related engineering considerations as interconnected parts of pavement engineering. (AASHTO Store)
The Institution of Civil Engineers (ICE) is also an important professional reference point for civil infrastructure practice, engineering competence, and project delivery.
The practical lesson is simple: follow the project-specific contract documents first, then the standards and specifications referenced by those documents. Do not copy layer thicknesses, temperatures, compaction percentages, or material limits from another project without confirming applicability.
Common Mistakes in Road Construction
Several recurring mistakes can reduce pavement life.
Poor Subgrade Preparation
Building expensive pavement over weak soil is rarely a good solution. The foundation must be investigated and corrected first.
Inadequate Drainage
Blocked outlets, incorrect gradients, poorly constructed culverts, and trapped water can cause serious pavement deterioration.
Incorrect Layer Thickness
Thin spots can reduce structural capacity, while uncontrolled thick layers can make compaction difficult and affect quantities.
Insufficient Compaction
Low density in earthwork, granular layers, or asphalt can create long-term performance problems.
Poor Joint Construction
Longitudinal and transverse joints require careful attention because they can become weak points for water ingress and cracking.
Weak Quality Documentation
A contractor may physically construct good work, but poor records make it difficult to demonstrate compliance. Inspection requests, test results, survey records, material approvals, and as-built information should be maintained systematically.
Frequently Asked Questions About Road Construction Process
1. What is the first step in the Road Construction Process?
The first step is normally planning and investigation. Engineers assess traffic, alignment, terrain, soil, drainage, materials, utilities, environmental constraints, and project requirements before construction begins.
2. What are the main layers of a flexible road?
A typical flexible pavement can include prepared subgrade, sub-base, base course, asphalt binder course, and surface or wearing course. The exact configuration depends on pavement design and project specifications.
3. Why is subgrade important in road construction?
The subgrade provides the foundation for the pavement system. If it has inadequate strength, poor drainage, or excessive deformation, problems can propagate upward into the pavement.
4. What is the purpose of a road base course?
The base course provides substantial structural support and distributes traffic loads toward the lower pavement layers and subgrade. Its material quality and compaction are critical.
5. What is the difference between prime coat and tack coat?
A prime coat may be used on a prepared granular base when specified, while a tack coat primarily promotes bonding between bituminous layers or between an existing surface and a new asphalt layer.
6. Why is compaction important in road construction?
Compaction increases density and improves the engineering properties of soil, aggregates, and asphalt. Proper compaction helps reduce deformation, water penetration, settlement, and premature pavement distress.
7. What equipment is commonly used for road construction?
Typical equipment includes excavators, bulldozers, graders, dump trucks, water tankers, compactors, asphalt plants, asphalt pavers, rollers, milling machines, and surveying equipment.
8. How does drainage affect pavement life?
Effective drainage prevents water from accumulating within pavement layers and weakening the subgrade. Poor drainage can accelerate cracking, rutting, potholes, erosion, and structural deterioration.
9. How long does the Road Construction Process take?
There is no universal duration. Project length depends on road length, width, terrain, pavement type, weather, earthwork quantities, structures, traffic management, material availability, environmental restrictions, and contractor productivity.
10. Which standards should engineers use for road construction?
Engineers should use the standards specified in the project’s contract and technical documents. Depending on location and project requirements, these may include IRC and MoRTH specifications, AASHTO standards, national standards, agency specifications, and other referenced engineering documents.
Conclusion
The Road Construction Process is a coordinated engineering operation rather than a simple exercise in laying asphalt. The finished pavement depends on decisions and workmanship that begin much earlier with planning, investigation, surveying, material selection, earthwork, drainage, and subgrade preparation.
Each layer has a defined role. The subgrade provides the foundation, the sub-base and base distribute loads, and the asphalt system provides structural capacity and a safe riding surface. Drainage protects the entire system, while compaction, testing, surveying, and quality control ensure that the constructed road matches the engineering design.
For students, the biggest lesson is to understand the relationship between drawings, materials, equipment, testing, and actual site conditions. For engineers and contractors, disciplined inspection and construction sequencing are essential.
A durable road is rarely the result of one outstanding activity. It comes from consistent quality at every stage of construction.

Kamran Malik is a passionate civil engineering writer and researcher who specializes in construction, transportation, structural engineering, and infrastructure topics. Through his articles on CivilEngineerings.com, he simplifies complex engineering concepts and shares practical insights, industry trends, and educational resources for students, professionals, and engineering enthusiasts.