
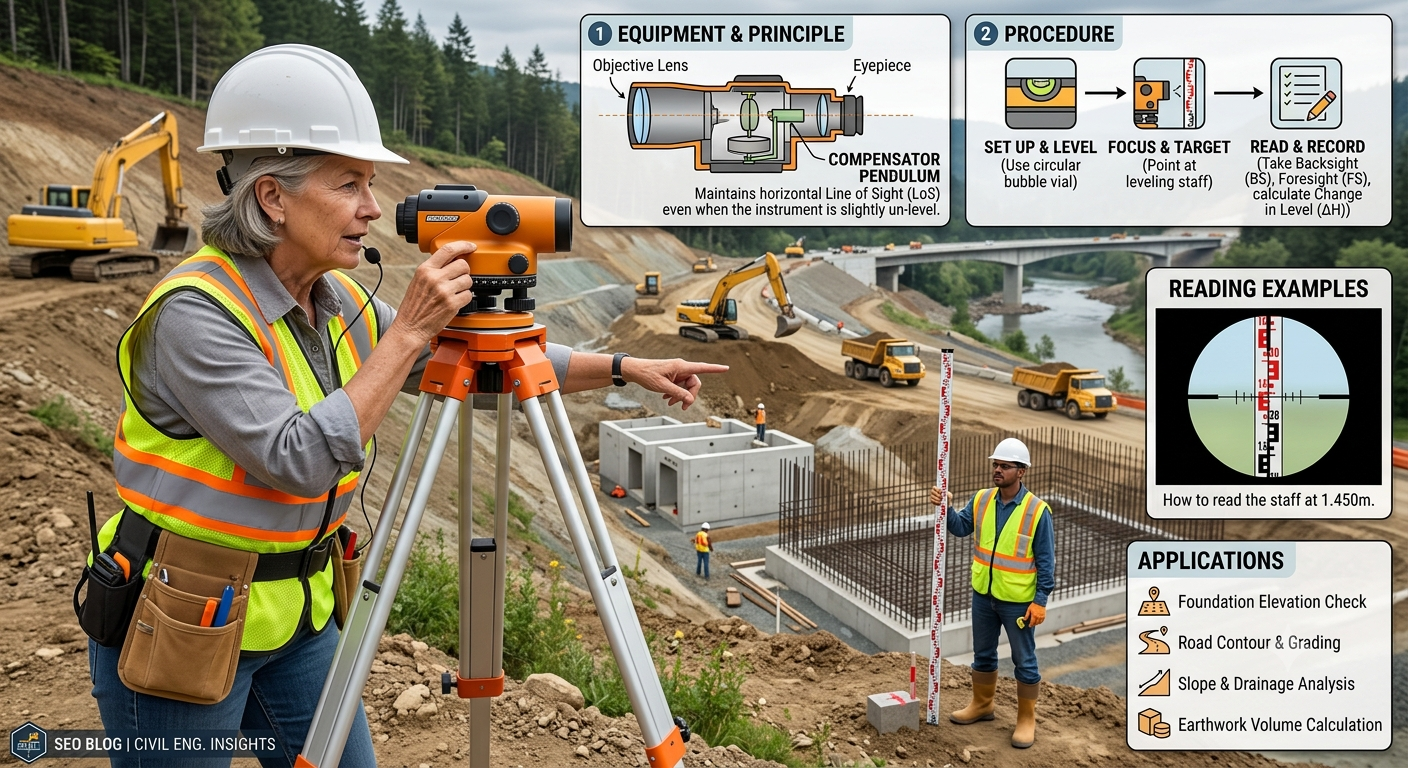
Learn everything about Auto Level Survey, including its working principle, equipment, field procedure, engineering applications, and best practices. This comprehensive guide is ideal for civil engineers, surveyors, contractors, and engineering students.
Introduction
Accurate surveying is the foundation of every successful civil engineering project. Before constructing roads, highways, bridges, buildings, railways, canals, or drainage systems, engineers must determine precise elevations and level differences across the project site. Even a small error in level measurement can result in improper drainage, uneven pavement, structural instability, or costly construction delays.
An Auto Level Survey is one of the most widely used surveying methods for determining height differences between points on the ground. It combines a high-precision optical telescope with an automatic compensator that maintains a horizontal line of sight, allowing surveyors to obtain reliable elevation data quickly and accurately.
Compared with traditional dumpy levels, an auto level requires less manual adjustment, reduces human error, and improves productivity on construction sites. Whether establishing benchmarks for a highway project or checking foundation levels for a multi-story building, the auto level remains an essential instrument in modern surveying.
This guide explains the Auto Level Survey in detail, covering its principles, components, equipment, and field procedure while sharing practical recommendations for engineers, contractors, and students.
What is an Auto Level Survey?
An Auto Level Survey is a leveling technique used to determine the difference in elevation between two or more points using an automatic optical level and a graduated leveling staff.
Unlike older leveling instruments, the auto level contains an internal compensator that automatically corrects minor tilts in the instrument, ensuring that the line of sight remains horizontal after rough leveling.
The primary objective of an auto level survey is to establish accurate elevations for engineering works where precise vertical measurements are critical.
Typical Uses
- Highway construction
- Road alignment
- Bridge projects
- Building foundations
- Canal construction
- Pipeline installation
- Railway projects
- Earthwork calculations
- Drainage systems
- Land development
Why Auto Level Survey is Important
Elevation data forms the basis of nearly every construction project. Engineers rely on auto level surveys to ensure that structures are built at the correct height and slope.
Key Benefits
- High measurement accuracy
- Faster surveying operations
- Reduced human error
- Easy operation
- Cost-effective equipment
- Suitable for long-distance leveling
- Reliable in different site conditions
For example, when constructing a highway, engineers use auto level surveys to establish the finished road profile, ensuring proper drainage and smooth vehicle movement.
Principle of Auto Level Survey
The auto level survey is based on the principle of establishing a horizontal line of sight from which vertical measurements are taken using a leveling staff.
Once the instrument is approximately leveled with the foot screws, the internal compensator automatically adjusts the telescope to maintain a perfectly horizontal line of sight.
The difference between staff readings at two points represents the difference in elevation.
Basic Formula
Reduced Level = Height of Instrument − Staff Reading
Where:
- Height of Instrument (HI) = Elevation of benchmark + Backsight
- Reduced Level (RL) = Actual elevation of the surveyed point
This simple concept allows surveyors to determine the relative heights of multiple locations with excellent precision.
Components of an Auto Level Instrument
Understanding the parts of an auto level helps users operate and maintain the equipment effectively.
1. Telescope
The telescope magnifies the leveling staff and allows the operator to read measurements accurately from a considerable distance.
Functions
- Provides clear magnification
- Enables accurate targeting
- Improves reading precision
2. Automatic Compensator
The automatic compensator is the defining feature of an auto level.
It consists of a pendulum-based optical mechanism that automatically corrects slight instrument tilts.
Advantages
- Maintains horizontal sight line
- Eliminates manual adjustment
- Improves accuracy
- Saves surveying time
3. Leveling Head
The leveling head supports the instrument and connects it to the tripod.
It allows fine adjustments before observations begin.
4. Foot Screws
Usually three foot screws are provided.
These are used for rough leveling before the automatic compensator takes over.
5. Eyepiece and Objective Lens
The eyepiece focuses the crosshairs, while the objective lens gathers light and forms a clear image of the leveling staff.
Proper focusing eliminates parallax errors.
6. Horizontal Circle
Many auto levels include a horizontal circle for measuring simple horizontal angles during surveying.
Although primarily designed for leveling, this feature increases the instrument’s versatility.
7. Tripod
The tripod provides a stable platform for the auto level.
A well-positioned tripod reduces vibration and improves measurement accuracy.
8. Levelling Staff
The leveling staff is a graduated measuring rod held vertically on survey points.
Common staff lengths include:
- 3 m
- 4 m
- 5 m
The surveyor reads the value where the telescope’s horizontal crosshair intersects the staff.
Equipment Used in Auto Level Survey
A typical auto level survey requires the following equipment:
- Auto Level Instrument
- Aluminum or Wooden Tripod
- Levelling Staff
- Staff Bubble (for verticality)
- Measuring Tape
- Survey Pegs
- Field Notebook
- Pencil or Digital Data Logger
- Hammer
- Marker Flags
Modern projects may also integrate GPS receivers and digital data collectors for improved efficiency.
Auto Level Survey Procedure (Step by Step)
Step 1: Site Preparation
Before taking measurements, inspect the survey area and identify benchmarks, turning points, and observation stations.
Ensure the ground is stable and free from unnecessary obstructions.
Step 2: Instrument Setup
Place the tripod over a convenient location where multiple points can be observed.
Firmly press the tripod legs into the ground to prevent movement.
Mount the auto level securely on the tripod head.
Step 3: Instrument Levelling
Use the foot screws to center the circular bubble approximately.
Once rough leveling is complete, the automatic compensator produces a precise horizontal line of sight.
Always verify that the compensator is functioning properly before taking observations.
Step 4: Focusing
First, focus the eyepiece until the crosshairs appear sharp.
Next, focus the telescope on the leveling staff.
Move your eye slightly to confirm that no parallax exists between the crosshair and staff image.
Step 5: Taking Staff Readings
Three common readings are recorded during leveling:
Backsight (BS)
The first reading taken on a benchmark with a known elevation.
Intermediate Sight (IS)
Readings taken on intermediate points whose elevations are required.
Foresight (FS)
The final reading before moving the instrument to a new location.
Accurate identification of BS, IS, and FS is essential for correct reduced level calculations.
Step 6: Recording Field Notes
Survey data should be recorded immediately in a leveling field book.
Typical columns include:
- Station
- Backsight
- Intermediate Sight
- Foresight
- Height of Instrument
- Reduced Level
- Remarks
Maintaining organized records minimizes calculation errors and simplifies data verification.
Step 7: Calculating Reduced Levels
Reduced levels are computed using either:
- Height of Instrument (HI) Method
- Rise and Fall Method
Both methods should produce identical results when calculations are performed correctly.
Independent arithmetic checks help detect recording mistakes before leaving the site.
Practical Field Example
Suppose a benchmark has a known elevation of 100.000 m.
- Backsight = 1.250 m
- Height of Instrument = 101.250 m
- Intermediate Staff Reading = 2.100 m
The reduced level of the surveyed point is:
RL = 101.250 − 2.100 = 99.150 m
This simple calculation demonstrates how elevation differences are determined during an auto level survey.
Engineering Diagram
Diagram 1: Auto Level Survey Setup
                    Telescope
                 ────────────────
                       │
                Auto Level Instrument
                       │
                    Tripod
                  /    │    \
                 /     │     \
                /      │      \
──────────────────────────────────── Ground

 Benchmark      Staff             Survey Point
     │            │                    │
     │            │                    │
     │            │                    │
Diagram 2: Basic Leveling Principle
Benchmark (RL Known)
        │
        │ BS
        ▼
============================ Horizontal Line of Sight ============================
                               │
                               │ IS
                               ▼
                          Survey Point

Difference in staff readings = Difference in elevation
Suggested Topic-Related Images for Your Blog
Include the following visuals to improve reader engagement and SEO:
- Auto level instrument mounted on a tripod at a construction site.
- Surveyor taking a staff reading during a highway survey.
- Levelling staff with graduated markings.
- Close-up image showing the automatic compensator inside an auto level (illustration).
- Highway earthwork survey using an auto level.
- Auto level field setup with benchmark and turning point.
- Civil engineer recording leveling observations in a field book.
- Cross-sectional illustration showing benchmark, line of sight, and reduced levels.
Use descriptive alt text such as “Auto Level Survey instrument measuring road formation levels” or “Surveyor using auto level and levelling staff during highway construction” to support image SEO.
Types of Auto Level Surveys
Auto level surveying can be performed using different methods depending on the nature of the project and the required accuracy. Selecting the appropriate method helps engineers collect reliable elevation data while improving efficiency in the field.
1. Simple Leveling
Simple leveling is used when two points are visible from a single instrument setup. It is the most basic form of leveling and is commonly used for small construction projects.
Applications
- Building foundations
- Residential site grading
- Small retaining walls
2. Differential Leveling
Differential leveling determines the elevation difference between points that are far apart. The instrument is moved several times, and turning points are established to continue the survey.
Applications
- Highway projects
- Railway construction
- Canal alignment
- Long pipelines
3. Profile Leveling
Profile leveling measures ground elevations along a proposed centerline to prepare longitudinal sections.
Applications
- Road design
- Highway vertical alignment
- Railway profile surveys
- Drainage channel design
4. Cross-Section Leveling
Cross-section leveling measures elevations perpendicular to the centerline at regular intervals.
These measurements help engineers estimate earthwork quantities and prepare cross-sectional drawings.
Applications
- Highway widening
- Earthwork calculations
- Canal excavation
- Embankment design
5. Fly Leveling
Fly leveling is a rapid method used to transfer benchmark elevations from one location to another with minimal observations.
Applications
- Establishing temporary benchmarks
- Connecting permanent benchmarks
- Preliminary engineering surveys
Applications of Auto Level Survey in Civil Engineering
An Auto Level Survey is one of the most versatile surveying techniques used across civil engineering projects. Accurate level measurements ensure that structures are built according to design elevations and function safely throughout their service life.
Road and Highway Construction
Surveyors establish formation levels, pavement elevations, and road gradients to ensure smooth driving surfaces and effective drainage.
Building Construction
Auto levels are used to check excavation depths, footing levels, plinth levels, floor elevations, and roof heights.
Bridge Construction
Engineers verify foundation levels, pier elevations, deck levels, and approach road elevations to maintain structural alignment.
Railway Engineering
Track gradients and formation levels are carefully controlled using auto level surveys to improve safety and passenger comfort.
Canal and Irrigation Projects
Accurate leveling is essential for maintaining the designed water flow and preventing overflow or insufficient discharge.
Pipeline Installation
Proper pipe gradients are established to ensure efficient flow in gravity-based water supply and sewerage systems.
Earthwork Projects
Auto level surveys provide accurate ground levels required for calculating cut-and-fill volumes.
Landscaping and Site Development
Level surveys help create smooth surfaces, sports grounds, parks, parking areas, and residential developments.
Engineering Principles Behind Auto Level Survey
Understanding the engineering principles improves both field accuracy and decision-making.
Horizontal Line of Sight
The auto level creates a perfectly horizontal reference line from which elevation differences are measured.
Difference in Elevation
The difference between two staff readings represents the vertical distance between the corresponding ground points.
Error Minimization
The automatic compensator continuously corrects small instrument tilts, reducing human error and improving precision.
Balanced Sight Distances
Whenever practical, backsight and foresight distances should be approximately equal. This practice minimizes the effects of instrument adjustment errors and atmospheric refraction.
Common Errors in Auto Level Survey
Even with an automatic compensator, surveying errors can occur if proper procedures are not followed.
Instrument Errors
- Improper calibration
- Damaged compensator
- Dirty lenses
- Loose tripod connections
Solution: Regularly calibrate and inspect the instrument before fieldwork.
Personal Errors
- Incorrect staff reading
- Recording mistakes
- Poor focusing
- Parallax not eliminated
Solution: Double-check observations and ensure the crosshairs and staff image are sharply focused.
Natural Errors
- Heat shimmer
- Strong winds
- Poor visibility
- Atmospheric refraction
Solution: Conduct surveys during favorable weather conditions and avoid long sight distances in extreme heat.
Staff Errors
- Staff not held vertically
- Damaged graduations
- Leaning staff
Solution: Use a staff bubble and inspect the staff regularly for wear or damage.
Best Practices for Accurate Auto Level Survey
Experienced surveyors follow standardized procedures to improve accuracy and efficiency.
- Inspect the instrument before every survey.
- Verify calibration periodically.
- Use a stable tripod on firm ground.
- Eliminate parallax before taking readings.
- Keep backsight and foresight distances nearly equal.
- Protect the instrument from vibration.
- Record observations immediately.
- Perform arithmetic checks before leaving the site.
- Avoid surveying during heavy rain or excessive heat.
- Store the instrument safely after use.
Following these practices reduces errors and ensures dependable survey results.
Practical Recommendations
Civil Engineers
- Confirm benchmark elevations before starting any project.
- Review leveling calculations carefully.
- Integrate survey data with project drawings and digital terrain models.
- Maintain detailed survey documentation for future reference.
Contractors
- Verify formation levels before placing concrete or pavement layers.
- Prevent unauthorized movement of benchmarks during construction.
- Train field personnel in proper leveling techniques.
- Schedule periodic level checks throughout the project.
Engineering Students
- Practice reading leveling staffs accurately.
- Learn both the Height of Instrument and Rise and Fall methods.
- Participate in field surveys to gain practical experience.
- Understand how leveling data supports design and construction decisions.
General Discussion of IRC, AASHTO, and ICE Practices
Professional engineering organizations such as IRC (Indian Roads Congress), AASHTO (American Association of State Highway and Transportation Officials), and ICE (Institution of Civil Engineers) emphasize the importance of accurate surveying during infrastructure development.
Although project specifications vary, these organizations generally recommend:
- Establishing reliable permanent benchmarks before construction.
- Performing regular instrument calibration and maintenance.
- Using qualified personnel to conduct leveling operations.
- Recording observations systematically for quality assurance.
- Verifying critical elevations through independent checks.
- Maintaining appropriate survey documentation throughout the project lifecycle.
- Integrating survey results into design reviews and construction quality control.
These practices contribute to safer, more durable, and better-performing infrastructure.
Advantages of Auto Level Survey
- High measurement accuracy
- Faster than traditional leveling methods
- Easy to operate
- Reduced manual adjustments
- Reliable automatic compensator
- Cost-effective for most construction projects
- Suitable for long-distance leveling
- Widely accepted in civil engineering practice
Limitations of Auto Level Survey
- Requires clear line of sight between instrument and staff.
- Accuracy depends on proper instrument calibration.
- Performance may be affected by extreme weather conditions.
- Manual staff readings are still subject to human error.
- Less efficient than digital levels for large-scale precision surveys.
Frequently Asked Questions (FAQs)
1. What is an Auto Level Survey?
An Auto Level Survey is a surveying method used to determine differences in elevation between points using an automatic optical level and a graduated leveling staff.
2. How does an auto level differ from a dumpy level?
An auto level contains an internal automatic compensator that maintains a horizontal line of sight after rough leveling, whereas a dumpy level requires more manual adjustment.
3. What is the purpose of a benchmark?
A benchmark is a fixed reference point with a known elevation used as the starting point for leveling calculations.
4. Why is a backsight reading important?
A backsight establishes the Height of Instrument (HI), which is required to calculate reduced levels accurately.
5. What is parallax, and how can it be avoided?
Parallax occurs when the crosshairs and the staff image are not focused in the same plane. Proper eyepiece and telescope focusing eliminate this error.
6. Which method is more accurate: Height of Instrument or Rise and Fall?
Both methods provide the same results when calculations are performed correctly. The Rise and Fall method offers additional arithmetic checks, while the Height of Instrument method is generally faster.
7. Where is an Auto Level Survey commonly used?
It is widely used in road construction, highway engineering, bridge projects, railway surveys, building construction, canal development, and pipeline installation.
8. How often should an auto level be calibrated?
Calibration should be carried out periodically according to the manufacturer’s recommendations and verified whenever the instrument experiences impact or displays inconsistent readings.
9. Can an auto level be used in windy conditions?
It can be used, but strong winds may affect the stability of the tripod and the vertical position of the leveling staff. Extra care is required.
10. Why are balanced sight distances recommended?
Keeping backsight and foresight distances approximately equal helps reduce systematic errors caused by instrument adjustment, atmospheric refraction, and Earth’s curvature.
Conclusion
An Auto Level Survey is an indispensable surveying technique that supports the successful execution of civil engineering and infrastructure projects. From establishing benchmarks and determining ground elevations to controlling construction levels and verifying finished work, the auto level delivers the accuracy required for roads, highways, bridges, buildings, railways, canals, and drainage systems. Its automatic compensator, ease of operation, and dependable performance make it one of the most widely used leveling instruments in the construction industry. However, achieving reliable results depends on correct setup, proper calibration, accurate field observations, and systematic record-keeping. By following established surveying procedures, applying recognized engineering practices, and maintaining high standards of quality control, engineers, contractors, and students can maximize the accuracy and efficiency of every Auto Level Survey. Mastering this essential skill not only improves project quality but also contributes to safer, more economical, and longer-lasting infrastructure.

Kamran Malik is a passionate civil engineering writer and researcher who specializes in construction, transportation, structural engineering, and infrastructure topics. Through his articles on CivilEngineerings.com, he simplifies complex engineering concepts and shares practical insights, industry trends, and educational resources for students, professionals, and engineering enthusiasts.