Introduction
Accurate ground elevation data forms the foundation of every successful highway, railway, canal, pipeline, and drainage project. Engineers rely on Profile Levelling to understand the natural shape of the land before preparing construction drawings or earthwork estimates. Without reliable profile data, designers cannot determine suitable road gradients, calculate cut-and-fill quantities, or design efficient drainage systems.
In highway engineering, Profile Levelling plays a vital role during the preliminary survey and detailed design stages. It helps engineers visualize the existing terrain, identify high and low points, and create a safe, economical vertical alignment. Whether the project involves a rural road, an expressway, or an urban street, this surveying technique ensures that the finished roadway follows the desired design levels while minimizing construction costs.
Civil engineers, surveyors, contractors, and engineering students must understand the principles, procedures, and practical applications of Profile Levelling. This guide explains every important concept with engineering examples, diagrams, and best practices to help you master one of the most important surveying operations in road construction.
What Is Profile Levelling?
Profile Levelling is a surveying method used to determine the elevations of points along a selected line at regular intervals. Engineers use these elevation measurements to prepare a longitudinal profile of the ground surface.
Unlike ordinary levelling, which determines the elevation of isolated points, profile levelling focuses on the continuous variation in ground level along the centerline of a proposed project.
In highway engineering, the centerline usually follows the proposed road alignment. Surveyors record elevation data at fixed chainages, such as every 10 m, 20 m, or 50 m, depending on the project requirements.
The resulting profile helps engineers design suitable road gradients, earthworks, and drainage systems.
Common Applications
Profile Levelling is widely used for:
- Highway construction
- Railway alignment
- Canal projects
- Pipeline installation
- Sewer networks
- Airport runways
- Transmission line routes
- Drainage channel design
Objectives of Profile Levelling
Engineers perform profile levelling to collect accurate elevation data that supports planning, design, and construction activities.
Main Objectives
- Determine ground elevations along a proposed alignment.
- Prepare longitudinal ground profiles.
- Design vertical curves and gradients.
- Calculate cut-and-fill quantities.
- Plan drainage systems.
- Identify low-lying and high-ground areas.
- Establish formation levels.
- Improve construction accuracy.
These objectives help reduce construction risks while optimizing project costs and safety.
Importance of Profile Levelling in Highway Engineering
Roads must provide smooth, safe, and comfortable travel. Engineers achieve this objective by designing proper vertical alignment based on accurate profile surveys.
Why It Matters
1. Vertical Alignment Design
Profile levelling allows engineers to design gradual slopes that improve vehicle safety and driving comfort.
2. Earthwork Estimation
Accurate profiles help estimate excavation and embankment volumes more precisely, reducing unnecessary costs.
3. Drainage Planning
Water should never accumulate on a roadway. Profile data enables engineers to design effective longitudinal and cross drainage systems.
4. Bridge and Culvert Design
Survey information identifies suitable locations for bridges, culverts, and cross-drainage structures.
5. Construction Control
Contractors use profile levels to ensure that construction follows the approved design elevations.
Practical Example
Suppose a proposed highway crosses rolling terrain with several hills and valleys. Profile levelling identifies these elevation changes, allowing designers to optimize the vertical alignment. As a result, the project requires less excavation, fewer embankments, and lower construction costs.
Equipment Used for Profile Levelling
Accurate results depend on well-maintained surveying equipment.
1. Automatic Level
An automatic level provides a horizontal line of sight and improves measurement accuracy.
2. Dumpy Level
Many educational institutions still use dumpy levels to teach basic surveying principles.
3. Digital Level
Digital levels automatically record staff readings, reducing human error and increasing productivity.
4. Levelling Staff
The levelling staff measures vertical distances from the instrument line of sight to the ground.
5. Tripod Stand
The tripod supports the level instrument and maintains stability during observations.
6. Measuring Tape or Chain
Surveyors use measuring tapes or chains to locate stations along the alignment.
7. Pegs and Ranging Rods
These accessories help mark chainages and identify observation points.
Engineering Principles Behind Profile Levelling
Profile levelling follows fundamental surveying principles that ensure measurement accuracy.
Horizontal Line of Sight
The level instrument creates a horizontal reference line from which all staff readings are measured.
Difference in Elevation
Surveyors determine the difference in elevation by comparing backsight, intermediate sight, and foresight readings.
Bench Marks
Every profile survey begins from a known elevation called a benchmark. This reference point maintains consistency throughout the survey.
Continuous Measurement
Regular intervals between stations produce a detailed representation of the existing ground profile.
Step-by-Step Profile Levelling Procedure
Step 1: Reconnaissance Survey
The survey team first visits the site to understand the terrain and identify potential challenges.
During this stage, engineers:
- Study existing maps.
- Inspect ground conditions.
- Select the proposed alignment.
- Identify obstacles.
- Locate permanent reference points.
A thorough reconnaissance improves survey efficiency and reduces field errors.
Step 2: Establishing Bench Marks
Surveyors establish a benchmark with a known elevation near the project site.
The benchmark serves as the starting point for all subsequent level calculations.
Temporary benchmarks may also be created at suitable intervals to maintain accuracy throughout the survey.
Step 3: Setting Up the Level Instrument
The surveyor positions the level instrument on stable ground between observation points.
The setup process includes:
- Fixing the instrument to the tripod.
- Levelling the instrument accurately.
- Eliminating parallax.
- Checking instrument stability.
Proper setup ensures reliable observations.
Step 4: Taking Staff Readings
Surveyors place the levelling staff vertically at each chainage.
Typical observations include:
- Backsight (BS)
- Intermediate Sight (IS)
- Foresight (FS)
The surveyor records readings at regular intervals and at all significant changes in ground slope.
Typical chainages include:
- Every 10 m
- Every 20 m
- Every 25 m
- Every 50 m
Additional readings are taken wherever the ground changes abruptly.
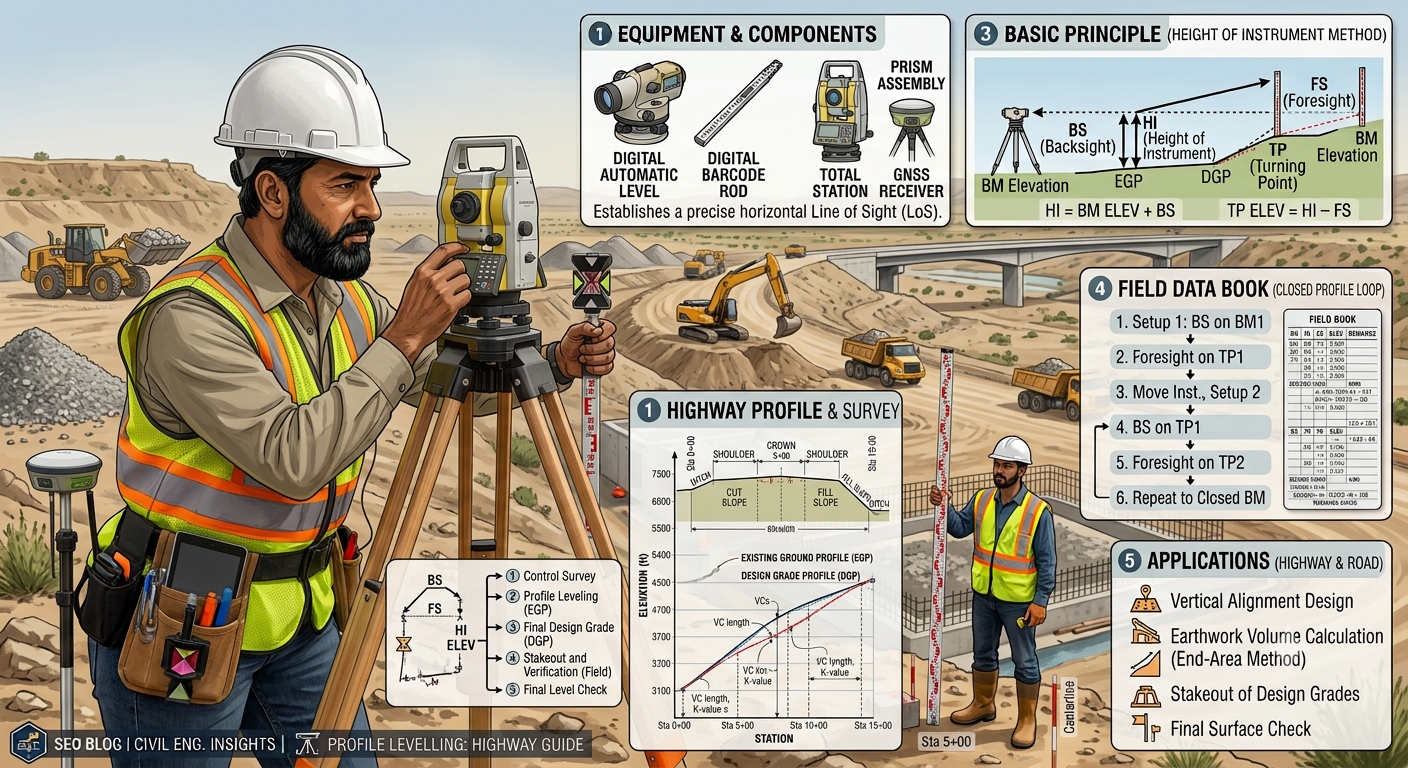
Step 5: Recording Field Data
Accurate field notes are essential for preparing reliable longitudinal profiles.
Surveyors record:
- Chainage
- Backsight
- Intermediate Sight
- Foresight
- Reduced Level (RL)
- Remarks
Neat and complete records simplify office calculations and reduce the likelihood of mistakes.
Step 6: Plotting the Longitudinal Profile
After completing the field survey, engineers transfer the data to graph paper or computer software.
The horizontal axis represents chainage, while the vertical axis represents elevation.
Connecting the measured points creates the natural ground profile.
Engineers then superimpose the proposed formation level to compare existing and design elevations.
Typical Field Book Format
| Chainage (m) | BS | IS | FS | RL (m) | Remarks |
|---|---|---|---|---|---|
| 0 | 1.245 | – | – | 100.000 | Bench Mark |
| 20 | – | 1.685 | – | 99.560 | Ground Point |
| 40 | – | 2.015 | – | 99.230 | Ground Point |
| 60 | – | – | 1.950 | 99.295 | Change Point |
Proper field records ensure smooth calculations during profile preparation.
Profile Levelling Diagram
                Level Instrument
                     ▲
                     │ Horizontal Line of Sight
────────────────────────────────────────────────────

      │             │              │             │
      │             │              │             │
     Staff         Staff          Staff         Staff
      │             │              │             │
     BM            20 m           40 m          60 m

────────────────────────────────────────────────────
 Existing Ground Profile
The diagram illustrates how surveyors observe elevations along the proposed road alignment to develop a continuous ground profile.
Practical Engineering Example
Consider a proposed 3 km two-lane highway connecting two villages. During the profile levelling survey, engineers collect elevation data every 20 m along the centerline. The resulting profile reveals several steep rises and shallow depressions. Designers use this information to establish a smooth vertical alignment, calculate excavation and embankment quantities, position culverts at natural drainage paths, and optimize construction costs while maintaining safe driving gradients.
Longitudinal Profile
A longitudinal profile is a graphical representation of the existing ground elevations plotted along the centerline of a proposed road, railway, canal, or pipeline. Engineers prepare this profile using the reduced levels collected during profile levelling.
The horizontal axis represents the chainage or distance, while the vertical axis represents the elevation. Since ground level changes are often small compared to the project length, engineers usually adopt a larger vertical scale than the horizontal scale to improve clarity.
Components of a Longitudinal Profile
A standard profile drawing generally includes:
- Existing Ground Level (EGL)
- Proposed Formation Level (PFL)
- Chainages
- Reduced Levels (RLs)
- Vertical Curves
- Gradients
- Culvert and Bridge Locations
- Cut and Fill Sections
Importance in Highway Design
The longitudinal profile helps engineers:
- Design safe road gradients.
- Improve driving comfort.
- Reduce unnecessary earthwork.
- Maintain adequate drainage.
- Identify suitable locations for bridges and culverts.
- Estimate construction quantities more accurately.
Simple Longitudinal Profile Diagram
Elevation
  ^
  |
110|                         Existing Ground
108|                      /\        /\
106|                    /   \______/  \____
104|------------------- Proposed Formation Level ----------
102|
100|
   +------------------------------------------------------------>
      0     100     200     300     400     500 m (Chainage)
The difference between the existing ground and the proposed formation level indicates whether excavation (cut) or embankment (fill) is required.
Cross Sections in Profile Levelling
While the longitudinal profile shows elevation changes along the centerline, cross sections display the ground shape at right angles to the alignment.
Engineers normally record cross sections at:
- Regular intervals
- Sharp terrain changes
- Stream crossings
- Bridge locations
- Major intersections
Purpose of Cross Sections
Cross sections help engineers:
- Determine road width.
- Design embankment slopes.
- Calculate earthwork volumes.
- Design side drains.
- Estimate construction materials.
- Prepare detailed construction drawings.
Typical Cross Section Diagram
              Road Centerline
                    │
      Shoulder      │      Shoulder
───────────────┬────┴────┬──────────────
              /          \
             /            \
 Existing Ground Surface
Longitudinal profiles and cross sections together provide a complete picture of the terrain and form the basis for accurate highway design.
Profile Levelling Calculations
Surveyors calculate reduced levels using two common methods.
1. Height of Instrument (HI) Method
This method calculates the height of the instrument for each setup.
Formula
HI = RL of Benchmark + Backsight
RL = HI − Staff Reading
Advantages
- Simple calculations.
- Faster for long surveys.
- Easy to identify arithmetic mistakes.
- Preferred for highway profile surveys.
2. Rise and Fall Method
This method compares consecutive staff readings to determine whether the ground rises or falls.
Advantages
- Provides better arithmetic checks.
- Detects recording errors more easily.
- Produces highly reliable survey records.
Although both methods produce the same reduced levels, engineers often select the HI method for routine profile levelling because of its simplicity.
Engineering Applications of Profile Levelling
Profile levelling supports numerous civil engineering projects.
Highway Engineering
- Vertical alignment design
- Earthwork estimation
- Pavement design
- Drainage planning
Railway Engineering
- Track gradient design
- Bridge approach design
- Station yard planning
Canal Engineering
- Canal bed alignment
- Flow control
- Embankment design
Pipeline Projects
- Gravity flow analysis
- Pipe invert level design
- Pump station planning
Airport Engineering
- Runway grading
- Taxiway alignment
- Surface drainage
Common Errors in Profile Levelling
Even experienced surveyors can make mistakes if proper procedures are not followed.
Instrument Errors
- Poor instrument adjustment
- Incorrect leveling
- Parallax
- Damaged equipment
Personal Errors
- Staff not held vertically
- Incorrect reading
- Recording mistakes
- Misidentification of chainages
Natural Errors
- Wind affecting the staff
- Atmospheric refraction
- Earth curvature
- Poor visibility
How to Minimize Survey Errors
Survey teams can improve accuracy by following these practices:
- Calibrate instruments before starting work.
- Remove parallax before taking readings.
- Hold the staff perfectly vertical.
- Use stable tripod positions.
- Take check readings regularly.
- Verify field book entries immediately.
- Close the leveling loop whenever possible.
- Protect benchmarks throughout the survey.
Small improvements in field practice often prevent costly design revisions later.
Best Practices for Profile Levelling
Professional survey teams consistently follow proven engineering practices.
Before Field Work
- Study project drawings.
- Review existing survey data.
- Inspect equipment.
- Confirm benchmark locations.
During Survey
- Maintain equal backsight and foresight distances where practical.
- Record observations immediately.
- Check every instrument setup.
- Avoid unstable ground for tripod placement.
- Take additional readings where terrain changes rapidly.
After Survey
- Verify calculations.
- Compare field notes with plotted profiles.
- Check benchmark closures.
- Archive survey records safely.
- Prepare clear profile drawings.
Practical Recommendations
Civil Engineers
- Review profile drawings before finalizing vertical alignment.
- Coordinate profile data with drainage and pavement designers.
- Verify earthwork quantities using digital terrain models when available.
- Schedule additional surveys if significant site changes occur.
Contractors
- Protect survey control points during construction.
- Confirm formation levels before earthworks begin.
- Perform periodic level checks throughout construction.
- Communicate discrepancies immediately to the supervising engineer.
Engineering Students
- Practice both the Height of Instrument and Rise and Fall methods.
- Learn to prepare profile sheets manually before using software.
- Participate in field surveying exercises.
- Understand the relationship between profile levelling, vertical curves, and earthwork estimation.
General Discussion of IRC, AASHTO, and ICE Practices
Leading highway engineering organizations such as IRC, AASHTO, and the Institution of Civil Engineers (ICE) emphasize the importance of accurate surveying as the foundation of successful infrastructure projects.
Although their standards differ in detail, they generally recommend:
- Establishing reliable benchmarks before fieldwork.
- Conducting detailed topographic and profile surveys during the planning stage.
- Maintaining strict quality control for survey observations.
- Verifying calculations through independent checks.
- Integrating survey data with pavement, drainage, and structural design.
- Preserving complete survey records for future maintenance and rehabilitation work.
Following these accepted engineering practices improves project accuracy, construction efficiency, and long-term performance.
Frequently Asked Questions (FAQs)
1. What is Profile Levelling?
Profile Levelling is a surveying technique used to determine ground elevations along a selected alignment and prepare a longitudinal profile for engineering design.
2. Why is Profile Levelling important in road construction?
It provides the elevation data needed to design road gradients, estimate earthwork quantities, plan drainage, and establish formation levels.
3. What equipment is required for Profile Levelling?
Common equipment includes an automatic level or digital level, a levelling staff, a tripod, measuring tape or chain, ranging rods, and survey pegs.
4. What is the difference between profile levelling and cross-section levelling?
Profile levelling measures elevations along the centerline, whereas cross-section levelling records elevations perpendicular to the alignment to determine the ground shape across the corridor.
5. Which calculation method is better for Profile Levelling?
Both the Height of Instrument method and the Rise and Fall method produce accurate results. The HI method is generally faster, while the Rise and Fall method provides additional arithmetic checks.
6. How often should survey readings be taken?
Surveyors usually take readings at regular intervals, such as every 10 m, 20 m, or 50 m, and at all significant changes in ground slope.
7. What causes errors during Profile Levelling?
Instrument miss adjustment, poor staff handling, recording mistakes, unstable setups, and environmental conditions such as wind or poor visibility can reduce accuracy.
8. How does Profile Levelling help estimate earthwork?
By comparing existing ground levels with proposed formation levels, engineers can calculate the volumes of excavation (cut) and embankment (fill) required for construction.
9. Can modern technology replace traditional Profile Levelling?
Technologies such as total stations, GNSS, drones, and LiDAR improve efficiency and data collection. However, profile levelling remains essential for achieving precise elevation control on many projects.
10. Who uses Profile Levelling?
Civil engineers, highway engineers, surveyors, contractors, railway engineers, irrigation engineers, and infrastructure consultants use profile levelling during planning, design, construction, and maintenance.
Conclusion
Profile Levelling remains one of the most valuable surveying techniques in civil and highway engineering because it provides the accurate elevation data needed to design safe, economical, and durable infrastructure. From establishing benchmarks and collecting field measurements to preparing longitudinal profiles and calculating earthwork quantities, every stage contributes to successful project planning and execution. Engineers rely on profile levelling to optimize vertical alignment, improve drainage, reduce construction costs, and minimize future maintenance.
Contractors use the survey data to control formation levels and ensure construction follows the approved design, while engineering students develop essential surveying skills through field practice and calculation methods. By following established engineering principles, maintaining strict quality control, and applying the guidance commonly reflected in IRC, AASHTO, and ICE practices, professionals can achieve reliable survey results that support high-quality transportation infrastructure. Mastering Profile Levelling equips engineers and surveyors with the knowledge required to deliver accurate, efficient, and sustainable road projects.
