
Introduction
Roads, highways, airports, and industrial pavements rely on a strong foundation to achieve long-term performance. Weak soils often fail to support traffic loads, resulting in settlement, rutting, cracking, and premature pavement failure. Civil engineers overcome these challenges by improving soil properties before construction begins. Among the available ground improvement techniques, Lime Stabilization remains one of the most effective and economical solutions for cohesive soils.
Lime Stabilization improves soil strength, reduces plasticity, minimizes swelling, and increases bearing capacity through chemical reactions between lime, water, and clay minerals. Highway agencies around the world use this method to build durable pavements while reducing construction costs and extending service life.
This guide explains the science, engineering principles, construction process, applications, and best practices of Lime Stabilization. Whether you are a civil engineering student, site engineer, contractor, or highway consultant, this article provides practical knowledge supported by modern road engineering practices.
What is Lime Stabilization?
Lime Stabilization is a soil improvement technique that mixes lime with weak soils to enhance their engineering properties. The process transforms soft, plastic, and moisture-sensitive soils into stronger and more stable construction materials.
Highway engineers commonly apply lime stabilization to clay-rich soils because lime reacts effectively with clay minerals. The treatment increases soil strength while reducing shrinkage, swelling, and water sensitivity.
Objectives of Lime Stabilization
- Increase soil bearing capacity.
- Reduce plasticity.
- Improve workability.
- Minimize volume changes.
- Enhance long-term durability.
- Extend pavement service life.
- Reduce maintenance costs.
Why Lime Stabilization is Important
Poor subgrade conditions often cause pavement distress long before the design life ends. Instead of replacing unsuitable soil, engineers frequently stabilize it with lime, saving both time and construction costs.
Benefits for Highway Projects
- Improves foundation stability.
- Reduces pavement thickness requirements.
- Accelerates construction.
- Lowers material transportation costs.
- Increases resistance to moisture damage.
- Enhances long-term pavement performance.
Practical Example
A highway project encounters highly plastic clay with a California Bearing Ratio (CBR) of only 3%. Laboratory testing recommends adding 5% hydrated lime. After stabilization and curing, the CBR increases significantly, allowing the pavement to carry higher traffic loads without excessive deformation.
Chemistry of Lime Stabilization
The success of Lime Stabilization depends on several chemical reactions that modify soil behavior.
Immediate Reactions
Immediately after mixing lime with moist soil, the following changes occur:
- Moisture content decreases.
- Soil becomes friable.
- Plasticity reduces.
- Workability improves.
- Compaction becomes easier.
These changes occur within hours and allow construction activities to continue more efficiently.
Long-Term Pozzolanic Reactions
Over time, lime reacts with silica and alumina present in clay minerals to form cementitious compounds.
These compounds include:
- Calcium Silicate Hydrate (CSH)
- Calcium Aluminate Hydrate (CAH)
These reaction products bind soil particles together, creating a stronger and more durable layer.
Simplified Chemical Process
Clay Soil + Lime + Water
          │
          ▼
 Cation Exchange
          │
          ▼
 Flocculation & Agglomeration
          │
          ▼
 Pozzolanic Reaction
          │
          ▼
 Strong Stabilized Soil
This transformation explains why stabilized soils continue gaining strength over weeks and months.
Types of Lime Used in Soil Stabilization
Selecting the correct type of lime is essential for successful stabilization.
Hydrated Lime
Hydrated lime contains calcium hydroxide and is widely used because it is safer to handle and easier to spread.
Advantages
- Easy application.
- Uniform mixing.
- Reduced dust.
- Consistent performance.
Quicklime
Quicklime contains calcium oxide and reacts rapidly with water.
Advantages
- Removes excess moisture.
- Generates heat during hydration.
- Suitable for wet construction conditions.
Considerations
Workers must follow strict safety procedures because quicklime is highly reactive.
Dolomitic Lime
Dolomitic lime contains calcium and magnesium compounds.
Engineers use it where local specifications or material availability make it a suitable alternative.
Suitable Soils for Lime Stabilization
Not every soil responds equally to lime treatment.
Most Suitable Soils
- High-plasticity clay
- Medium-plasticity clay
- Silty clay
- Clayey silt
Less Suitable Soils
- Clean sand
- Gravel
- Organic soils
- Peat
- Highly acidic soils
Laboratory testing determines whether lime stabilization is appropriate for a particular project.
Engineering Principles of Lime Stabilization
Several engineering principles govern successful stabilization.
Plasticity Reduction
Lime decreases the Plasticity Index (PI), making soil easier to compact and less susceptible to moisture changes.
Strength Improvement
Pozzolanic reactions create cementitious bonds that significantly increase soil strength.
Moisture Resistance
Stabilized soil becomes less sensitive to seasonal moisture variations, reducing shrinkage and swelling.
Increased Bearing Capacity
Higher bearing capacity allows the stabilized layer to support heavier traffic loads while reducing pavement thickness requirements.
Durability Enhancement
Properly stabilized soil resists weathering, erosion, and repeated traffic loading over many years.
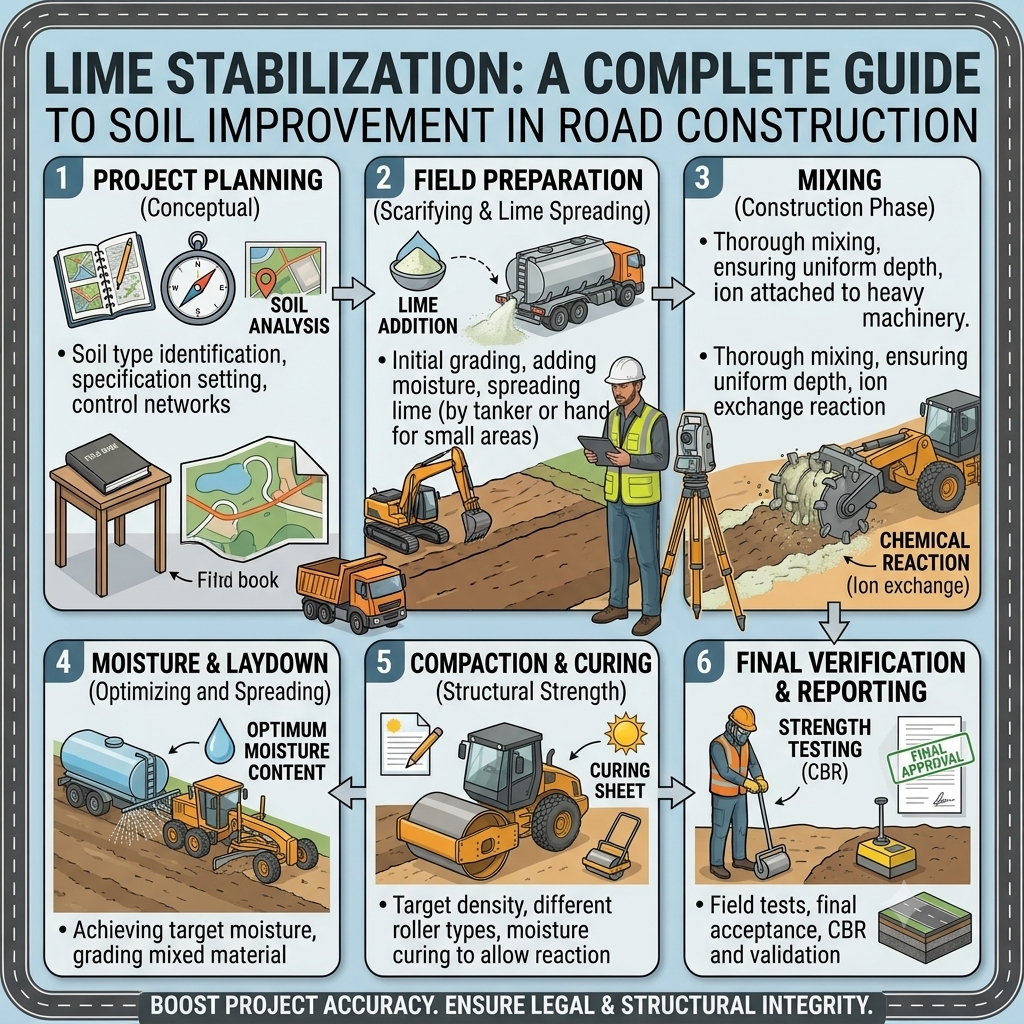
Lime Stabilization Process Step by Step
Step 1: Site Investigation
Every stabilization project begins with a detailed site investigation.
Engineers evaluate:
- Soil profile
- Groundwater conditions
- Existing pavement condition
- Drainage
- Traffic requirements
- Construction constraints
Common Investigation Methods
- Boreholes
- Trial pits
- Soil sampling
- Topographic survey
Accurate site data forms the basis for selecting the appropriate stabilization method.
Step 2: Soil Testing
Laboratory testing identifies soil properties before stabilization begins.
Common Tests
- Grain Size Analysis
- Atterberg Limits
- Moisture Content Test
- California Bearing Ratio (CBR)
- Standard Proctor Test
- Modified Proctor Test
- pH Test
Why Testing Matters
These tests determine:
- Lime suitability.
- Optimum lime content.
- Moisture requirements.
- Expected strength improvement.
Step 3: Lime Selection
Engineers select lime type based on:
- Soil characteristics.
- Moisture condition.
- Climate.
- Construction method.
- Project specifications.
- Material availability.
Laboratory mix design determines the optimum percentage of lime, which commonly ranges between 3% and 8% by dry weight of soil, depending on soil type.
Step 4: Surface Preparation
Before lime application, the construction area requires proper preparation.
Activities Include
- Clearing vegetation.
- Removing unsuitable materials.
- Grading the surface.
- Establishing drainage.
- Scarifying the existing soil layer.
Proper preparation promotes uniform lime distribution and effective mixing.
Step 5: Lime Spreading and Mixing
This stage initiates the stabilization process.
Specialized spreaders distribute lime uniformly over the prepared surface according to the approved application rate.
Mixing equipment blends the lime thoroughly with the soil to achieve a homogeneous mixture.
Equipment Commonly Used
- Lime spreaders
- Rotary reclaimers
- Soil stabilizers
- Motor graders
- Water tankers
Best Practice
Uniform mixing is essential. Poor distribution creates weak zones that reduce pavement performance and durability.
Topic-Related Diagram
Typical Lime-Stabilized Pavement Structure
=========================================
 Asphalt Wearing Course
=========================================
 Binder Course
=========================================
 Base Course
=========================================
 Lime Stabilized Subgrade
=========================================
 Natural Ground
Lime Stabilization Process Flow
Site Investigation
        │
        ▼
 Soil Testing
        │
        ▼
 Lime Selection
        │
        ▼
 Surface Preparation
        │
        ▼
 Lime Spreading
        │
        ▼
 Uniform Mixing
        │
        ▼
 Moisture Conditioning
        │
        ▼
 Compaction
        │
        ▼
 Curing
        │
        ▼
 Quality Control
Key Takeaways
Lime Stabilization transforms weak clay soils into durable construction materials through carefully controlled chemical reactions and proper construction practices. Successful projects begin with thorough site investigations, detailed laboratory testing, appropriate lime selection, and uniform mixing. These initial stages establish the foundation for improved strength, reduced plasticity, enhanced moisture resistance, and long-lasting pavement performance. By following sound engineering principles during the early phases, engineers create stable subgrades that support safer, more economical, and more durable road infrastructure.
Step 6: Moisture Conditioning
Moisture plays a critical role in the success of Lime Stabilization. Engineers must maintain the soil-lime mixture near its Optimum Moisture Content (OMC) to achieve maximum density and strength.
After spreading and mixing the lime, water tankers spray the required amount of water over the surface. Rotary mixers then blend the water uniformly throughout the soil-lime mixture.
Objectives of Moisture Conditioning
- Activate the chemical reaction between lime and clay.
- Improve workability.
- Achieve optimum compaction.
- Prevent dry pockets within the stabilized layer.
- Ensure uniform strength development.
Best Practice
Engineers should check moisture content regularly during construction. Excess water reduces density, while insufficient moisture slows the pozzolanic reaction and affects long-term strength.
Step 7: Compaction
Compaction increases the density of the stabilized layer and creates a strong foundation for the pavement structure.
Construction crews should begin compaction immediately after mixing and moisture conditioning to achieve the required density before the material begins to harden.
Equipment Used
- Padfoot rollers
- Smooth drum rollers
- Pneumatic tire rollers
- Vibratory rollers
Compaction Procedure
- Spread the stabilized mixture uniformly.
- Adjust moisture to the optimum level.
- Compact the soil in multiple passes.
- Verify density through field testing.
- Trim the surface to the required grade.
Engineering Benefits
Proper compaction:
- Increases bearing capacity.
- Reduces settlement.
- Improves durability.
- Minimizes permeability.
- Enhances pavement performance.
Step 8: Curing
Curing allows pozzolanic reactions to continue after compaction. During this period, the stabilized soil gains strength and develops a durable internal structure.
Engineers normally protect the stabilized layer from excessive drying and heavy traffic until curing reaches the specified duration.
Typical Curing Period
Most projects allow curing for 3 to 7 days, although the exact period depends on project specifications, weather conditions, and lime content.
Factors Affecting Curing
- Temperature
- Moisture availability
- Soil type
- Lime percentage
- Construction quality
Best Practice
Maintain adequate moisture during curing whenever possible to support continuous strength development.
Step 9: Quality Control
Quality control ensures that every stabilized layer meets design specifications before the next pavement layer is placed.
Field engineers monitor construction continuously instead of waiting until the project ends.
Common Quality Control Tests
Moisture Content Test
Confirms that the mixture remains near the Optimum Moisture Content.
Field Density Test
Verifies that compaction achieves the specified density.
California Bearing Ratio (CBR)
Measures the strength improvement after stabilization.
Unconfined Compressive Strength (UCS)
Evaluates the load-carrying capacity of the stabilized soil.
Atterberg Limits
Checks the reduction in soil plasticity after treatment.
pH Test
Confirms that sufficient lime exists to sustain pozzolanic reactions.
Quality Control Checklist
- Correct lime dosage
- Uniform mixing
- Proper moisture content
- Required density
- Correct layer thickness
- Surface smoothness
- Proper curing
Step 10: Final Inspection
Before placing the sub-base or base course, engineers inspect the stabilized layer thoroughly.
Inspection Items
- Surface level
- Cross slope
- Layer thickness
- Density records
- Laboratory test results
- Drainage conditions
- Construction documentation
A successful inspection confirms that the stabilized layer can safely support the remaining pavement structure.
Equipment Used in Lime Stabilization
Modern road construction uses specialized equipment to achieve consistent results.
Common Equipment
- Lime spreader
- Rotary reclaimer
- Soil stabilizer
- Motor grader
- Water tanker
- Vibratory roller
- Pneumatic roller
- Smooth drum roller
- Survey equipment
- Nuclear or sand cone density testing equipment
Proper equipment selection improves productivity and construction quality.
Advantages of Lime Stabilization
Lime Stabilization offers numerous engineering and economic benefits.
Technical Advantages
- Increases soil strength.
- Reduces plasticity.
- Improves workability.
- Enhances bearing capacity.
- Minimizes swelling and shrinkage.
- Improves moisture resistance.
- Extends pavement life.
Economic Advantages
- Reduces excavation costs.
- Minimizes imported fill requirements.
- Lowers transportation expenses.
- Reduces pavement thickness.
- Decreases long-term maintenance costs.
Environmental Advantages
- Reuses in-situ soil.
- Conserves natural aggregate resources.
- Reduces waste disposal.
- Lowers construction-related emissions associated with hauling replacement materials.
Limitations of Lime Stabilization
Although highly effective, Lime Stabilization does not suit every project.
Limitations
- Performs poorly in highly organic soils.
- Requires careful moisture control.
- Needs adequate curing time.
- Produces dust if handled improperly.
- Demands proper mix design and laboratory testing.
- May require additional treatment for sulfate-rich soils.
Engineers should always verify soil suitability through laboratory testing before selecting lime stabilization.
Practical Applications in Road Engineering
Lime Stabilization serves many transportation and infrastructure projects.
Common Applications
- Highway subgrade improvement
- Rural road construction
- Airport pavements
- Industrial yards
- Container terminals
- Parking areas
- Railway embankments
- Temporary construction roads
- Residential street development
Practical Example
A highway project passes through an area with expansive clay that swells during the rainy season. Engineers stabilize the subgrade with hydrated lime after laboratory testing confirms the required dosage. The treated soil develops higher strength, resists moisture changes, and provides a stable foundation for the pavement, reducing future maintenance needs.
Best Practices for Lime Stabilization
Successful stabilization projects depend on careful planning and disciplined construction practices.
- Conduct detailed geotechnical investigations before construction.
- Perform laboratory mix design to determine the optimum lime content.
- Use high-quality lime from approved suppliers.
- Spread lime uniformly across the treatment area.
- Mix the soil and lime thoroughly.
- Maintain optimum moisture content during mixing and compaction.
- Complete compaction without unnecessary delays.
- Protect the stabilized layer during curing.
- Carry out continuous field testing and documentation.
- Follow approved project specifications and safety procedures.
Practical Recommendations
Civil Engineers
- Base design decisions on laboratory testing rather than assumptions.
- Monitor field moisture and density throughout construction.
- Coordinate geotechnical, pavement, and construction teams closely.
- Maintain detailed quality assurance records.
Contractors
- Calibrate spreading and mixing equipment regularly.
- Prevent lime segregation during application.
- Train workers in safe lime handling procedures.
- Avoid construction during heavy rainfall whenever practical.
Engineering Students
- Understand the chemistry behind lime stabilization.
- Learn standard laboratory and field tests.
- Observe active stabilization projects to connect theory with practice.
- Study pavement failures caused by poor subgrade treatment.
General Discussion of IRC, AASHTO, and ICE Practices
Recognized engineering organizations such as IRC, AASHTO, and ICE emphasize scientifically designed stabilization methods supported by field investigations and laboratory testing.
Their general recommendations include:
- Perform detailed soil classification before selecting stabilization methods.
- Determine the optimum lime content through laboratory evaluation.
- Design pavement layers based on anticipated traffic loading and subgrade strength.
- Maintain strict quality assurance throughout construction.
- Verify field density, moisture content, and stabilized layer thickness.
- Provide effective drainage to preserve long-term pavement performance.
- Follow documented construction procedures and material specifications.
These widely accepted engineering principles help produce durable, safe, and cost-effective highway infrastructure.
Frequently Asked Questions (FAQs)
1. What is Lime Stabilization in road construction?
Lime Stabilization is a soil improvement technique that mixes lime with clay-rich soils to increase strength, reduce plasticity, improve workability, and enhance pavement performance.
2. Which soils respond best to Lime Stabilization?
High-plasticity clay, medium-plasticity clay, silty clay, and clayey silt generally produce the best results after lime treatment.
3. How much lime is usually added to soil?
Most projects use between 3% and 8% lime by dry weight of soil, although laboratory testing determines the exact requirement.
4. Why does lime improve clay soils?
Lime reacts with clay minerals through cation exchange and pozzolanic reactions, forming cementitious compounds that increase strength and durability.
5. What tests should engineers perform before Lime Stabilization?
Engineers commonly perform Grain Size Analysis, Atterberg Limits, Moisture Content, Standard or Modified Proctor, California Bearing Ratio (CBR), pH testing, and mix design evaluations.
6. What equipment is required for Lime Stabilization?
Typical equipment includes lime spreaders, rotary reclaimers, soil stabilizers, motor graders, water tankers, rollers, and field testing equipment.
7. Can Lime Stabilization reduce pavement construction costs?
Yes. Lime Stabilization often allows engineers to reuse existing soils, reduce imported materials, decrease pavement thickness, and lower overall construction costs.
8. What are the main advantages of Lime Stabilization?
It increases bearing capacity, reduces plasticity, minimizes swelling, improves durability, enhances moisture resistance, and extends pavement life.
9. Does Lime Stabilization work for sandy soils?
Pure sands generally show limited improvement because they contain very little clay. Engineers usually consider alternative stabilization methods for granular soils.
10. Why is curing important after Lime Stabilization?
Curing allows pozzolanic reactions to continue, enabling the stabilized soil to gain strength and develop long-term durability.
Conclusion
Lime Stabilization remains one of the most reliable and economical soil improvement techniques used in modern road engineering. By transforming weak clay soils into stable, high-strength construction materials, it enables engineers to build durable highways, airport pavements, industrial roads, and other transportation facilities with improved performance and lower lifecycle costs. Successful projects begin with detailed site investigations, accurate laboratory testing, proper lime selection, and disciplined field construction. Uniform mixing, optimum moisture control, effective compaction, and adequate curing work together to maximize the benefits of the stabilization process. Continuous quality control further ensures that the treated layer meets design requirements before pavement construction proceeds. When engineers apply Lime Stabilization according to recognized engineering principles and accepted practices, they create stronger foundations, reduce maintenance demands, improve pavement longevity, and deliver safer, more sustainable infrastructure for future generations.
