
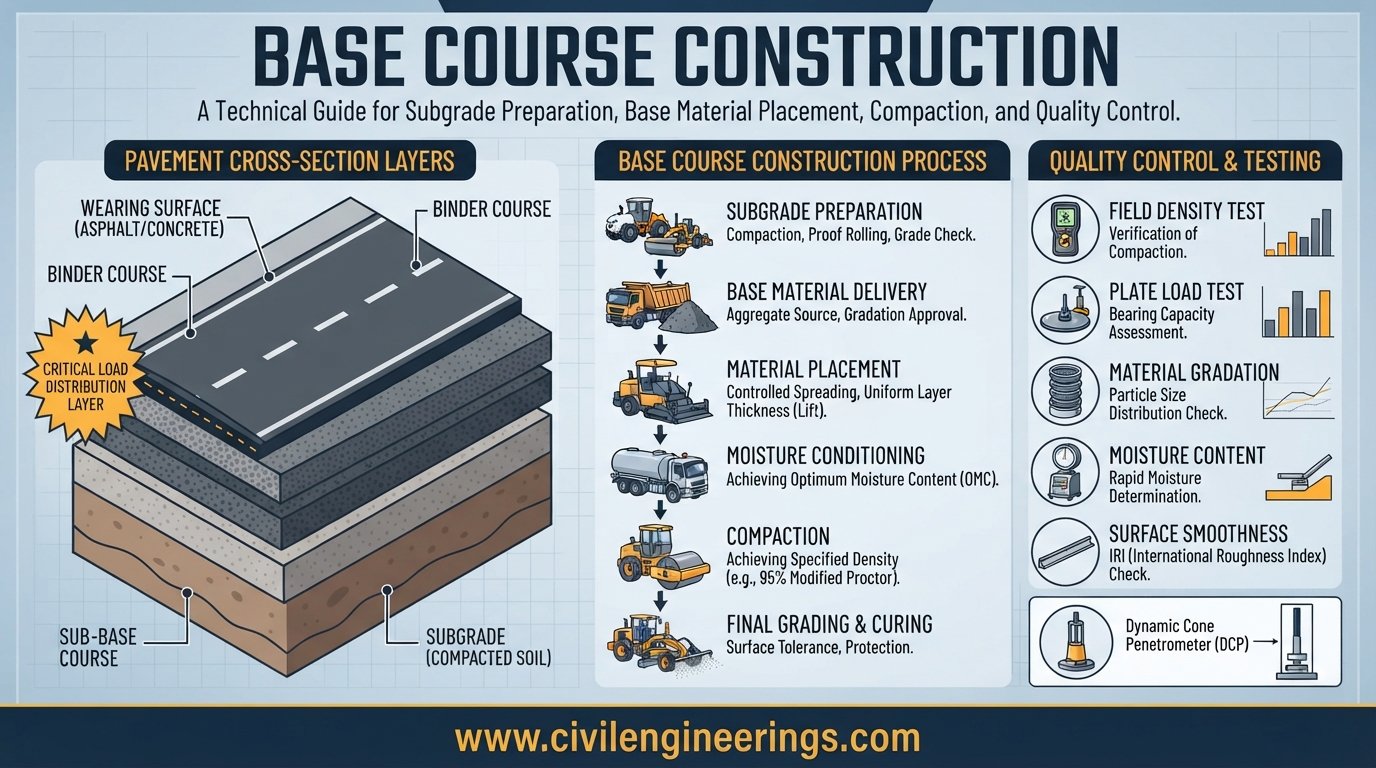
A road may look complete from the surface, but its long-term performance depends heavily on what lies underneath the asphalt or concrete. One of the most important structural layers is the base course. It distributes traffic loads, provides a stable platform for the surface pavement, controls deformation, and helps the road withstand repeated wheel loading and environmental conditions.
Base Course Construction therefore requires much more than placing and compacting crushed aggregate. Engineers must select suitable materials, prepare the underlying subbase or subgrade, control moisture, achieve the specified gradation, spread the material uniformly, and verify density and strength through field testing.
This guide explains the complete base course construction process from material selection to final inspection. It covers aggregate requirements, gradation, equipment, construction procedures, compaction principles, quality-control tests, common failures, practical calculations, and field recommendations. It is designed to help civil engineering students, site engineers, contractors, consultants, and highway professionals understand how a high-quality granular base is actually constructed in the field.
What Is Base Course Construction?
Base course construction is the process of preparing, placing, grading, watering, compacting, and testing a structural pavement layer located beneath the surface course.
In a typical flexible pavement, the base course sits above the subbase or prepared subgrade and below the asphalt-bound layers.
A simplified pavement structure can be represented as:
Asphalt Surface → Binder/Base Asphalt Layer → Granular Base Course → Subbase → Compacted Subgrade → Natural Soil
The exact arrangement varies according to pavement design, traffic loading, climate, drainage conditions, and applicable specifications.
The base course has a major structural role. It spreads wheel loads over a larger area so that stresses reaching the subgrade remain within acceptable limits.


Main Functions of a Base Course
A properly constructed base course performs several functions:
- Distributes traffic loads.
- Provides structural strength.
- Reduces pavement deformation.
- Creates a stable working platform.
- Improves pavement durability.
- Helps control stresses transmitted to the subgrade.
- Contributes to drainage where permeable materials are specified.
- Reduces the risk of rutting and localized settlement.
The importance of each function depends on pavement type and design.
Base Course vs Subbase
The base course and subbase are different pavement layers, although both commonly use granular materials.
The base course generally has higher structural requirements and better-controlled aggregate quality. The subbase normally lies beneath it and provides additional load distribution, drainage, frost protection, or separation from weak subgrade soils.
A road may contain both layers, only one granular layer, or specially stabilized layers depending on the engineering design.
Materials Used in Base Course Construction
Material selection is one of the most important decisions in road construction. Poor-quality aggregate cannot be transformed into a high-performing base simply through better compaction.
Common base materials include:
- Crushed stone.
- Crushed gravel.
- Mechanically stabilized aggregate.
- Well-graded granular material.
- Recycled aggregate where permitted.
- Cement-treated aggregate.
- Bitumen-treated granular materials.
- Other stabilized base materials specified by the project.
Crushed Aggregate
Crushed aggregate is widely used because angular particles can interlock effectively after compaction.
Good-quality crushed aggregate normally provides:
- High particle strength.
- Good resistance to crushing.
- Adequate abrasion resistance.
- Stable gradation.
- Durable mineral composition.
- Good interparticle friction.
The precise requirements should come from the project specifications rather than from a universal numerical value.
Aggregate Gradation
Gradation describes the distribution of particle sizes within the base material.
A well-designed granular base usually contains an appropriate combination of coarse particles, intermediate particles, and fines. The smaller particles fill voids between larger particles, while angular coarse particles provide structural interlock.
Gradation is commonly evaluated using sieve analysis.
For a sieve:
The resulting grading curve is compared with the specified grading envelope.
Plasticity and Fines
Excessive plastic fines can create problems, particularly when water enters the pavement system.
Plastic material may soften when wet and contribute to:
- Rutting.
- Pumping.
- Loss of bearing capacity.
- Permanent deformation.
- Reduced drainage.
- Construction difficulties.
Engineers commonly assess plasticity using tests such as the liquid limit, plastic limit, and plasticity index.
where:
- PI = Plasticity Index
- LL = Liquid Limit
- PL = Plastic Limit
The acceptable range depends on the governing specification and pavement application.
Base Course Construction Process Step by Step
A successful base course operation follows a controlled sequence. Skipping one stage can create defects that become expensive to repair later.


Prepare the Underlying Layer
Before placing the base material, the subbase or subgrade must be inspected.
The underlying surface should be:
- Properly compacted.
- At the required elevation.
- Correctly shaped.
- Free from standing water.
- Free from soft spots.
- Clean of excessive loose material.
- Within specified tolerances.
Surveyors should check centerline, offsets, crossfall, levels, and layer thickness.
A base course should never be used to compensate for a poorly prepared subgrade unless the design specifically allows such treatment.
Verify the Base Material
Before delivery to the site, the aggregate source should be evaluated.
Laboratory testing may include:
- Sieve analysis.
- Aggregate crushing resistance.
- Abrasion resistance.
- Soundness.
- Specific gravity.
- Water absorption.
- Atterberg limits for relevant fines.
- Modified or standard Proctor compaction.
- CBR where specified.
The actual test requirements depend on the contract specifications and material classification.
Control Moisture
Water plays a critical role in compaction.
When granular material contains insufficient moisture, particles may not rearrange efficiently. Excess water can produce instability, pumping, or reduced achievable density.
The objective is to compact the material near its specified optimum moisture condition.
The relationship between moisture content and dry density is commonly established through a Proctor-type compaction test.
where:
- = dry unit weight
- = wet unit weight
- = moisture content expressed as a decimal
Spread the Aggregate
The aggregate is normally transported using dump trucks and distributed with suitable equipment, often a motor grader or controlled spreading system.
Uniform spreading is essential.
The operator should avoid:
- Segregation.
- Large aggregate piles.
- Excessive grading passes.
- Uneven thickness.
- Contamination from underlying soil.
The material should be spread to provide enough thickness for achieving the designed compacted layer.
Establish the Correct Crossfall
The grader shapes the material to the specified profile.
Crossfall helps surface water move toward drainage facilities rather than allowing water to remain on the pavement.
Incorrect crossfall can result in:
- Water accumulation.
- Reduced pavement durability.
- Drainage problems.
- Uneven surface preparation.
Compact the Base Course
Compaction transforms loose aggregate into a dense and stable layer.
Typical equipment may include:
- Vibratory smooth-drum rollers.
- Static steel-wheel rollers.
- Pneumatic rollers.
- Combination rollers.
- Sheepsfoot-type equipment for suitable stabilized or soil-like materials.
The roller type must match the material.
For conventional crushed aggregate base, vibratory rollers are commonly effective because vibration helps particles rearrange and interlock.
Use an Effective Rolling Pattern
A rolling pattern should be established through a trial section when required.
Engineers may vary:
- Number of passes.
- Roller vibration setting.
- Roller speed.
- Moisture condition.
- Rolling direction.
A practical principle is to avoid unnecessarily high roller speed. Excessive speed can reduce the effectiveness of compaction and make it harder to achieve uniform density.
Final Grading
After initial compaction, the surface may require trimming.
The grader removes high spots and corrects localized irregularities. However, aggressive blading should be avoided because it can disturb the compacted structure and create segregation.
Final grading should produce the specified:
- Elevation.
- Crossfall.
- Width.
- Smoothness.
- Layer thickness.
Final Compaction and Inspection
Once the required profile has been achieved, final rolling may be performed.
Field personnel then verify:
- Density.
- Moisture.
- Thickness.
- Levels.
- Crossfall.
- Surface condition.
- Material quality.
Only after the layer meets the project requirements should the next pavement layer proceed.
Important Base Course Construction Equipment
Selecting the correct equipment improves productivity and quality.
Motor Grader
A motor grader controls:
- Line.
- Level.
- Crossfall.
- Surface profile.
- Material distribution.
Skilled grader operation is particularly important during final trimming.
Vibratory Roller
The vibratory roller applies dynamic energy to the aggregate.
Its effectiveness depends on:
- Amplitude.
- Frequency.
- Travel speed.
- Number of passes.
- Material moisture.
- Aggregate characteristics.
Water Tanker
Water should be applied uniformly. Excessive spraying can saturate localized areas and create instability.
Dump Trucks
Dump trucks transport aggregate from the quarry, crushing plant, or stockpile.
Truck operations should minimize segregation and contamination.
Wheel Loader
Wheel loaders commonly handle stockpiled aggregate and load transport trucks.
Stockpile management is important because poorly managed piles can cause segregation.
Base Course Compaction and Density Control
Compaction is one of the most critical quality-control activities.
The field dry density is compared with the laboratory maximum dry density.
A common calculation is:
For example, suppose:
- Laboratory maximum dry density = 2.18 Mg/m³
- Field dry density = 2.10 Mg/m³
Then:
Whether 96.33% is acceptable depends entirely on the project specification. Engineers should never assume that one compaction percentage applies to every road project.
Why Density Matters
Insufficient density can lead to:
- Settlement.
- Rutting.
- Loss of structural capacity.
- Particle movement.
- Differential deformation.
- Premature pavement cracking.
However, maximum density alone does not guarantee a successful base. Gradation, moisture, aggregate durability, thickness, drainage, and surface condition also matter.
Quality Control Tests for Base Course
Laboratory and field tests provide evidence that the constructed layer satisfies the design requirements.
Sieve Analysis
Sieve analysis determines aggregate particle-size distribution.
It is particularly important because gradation affects:
- Compaction.
- Stability.
- Voids.
- Permeability.
- Workability.
Moisture Content Test
Moisture content can be determined through laboratory or approved field methods.
The basic relationship is:
where:
- = mass of water
- = mass of dry soil or material
Field Density Test
Common methods include:
- Sand cone method.
- Nuclear density gauge.
- Other approved density methods.
The selected method must comply with project requirements and applicable testing standards.
Proctor Compaction Test
The laboratory compaction test establishes the relationship between moisture content and dry density.
The resulting values help identify:
- Maximum dry density.
- Optimum moisture content.
These values become important references for field compaction control.
CBR Test
The California Bearing Ratio test can provide an indication of the resistance of a material to penetration.
A simplified expression is:
The test procedure and reporting requirements must follow the applicable standard.
Aggregate Strength and Durability Tests
Depending on the specification, engineers may evaluate resistance to crushing, abrasion, weathering, and degradation.
These tests help determine whether the aggregate can withstand repeated traffic loading and environmental exposure.
Base Course Thickness and Quantity Calculation
Base thickness comes from pavement structural design, not from a universal rule.
For quantity estimation:
where:
- = compacted volume
- = length
- = average width
- = compacted thickness
For example, consider a road section:
- Length = 1,000 m
- Width = 7.3 m
- Compacted thickness = 0.20 m
Then:
The required loose aggregate quantity will be higher than the compacted volume because aggregate experiences volume reduction during compaction.
The contractor should use an approved conversion or field-established compaction factor rather than applying an arbitrary percentage.
Common Base Course Construction Problems
Several defects repeatedly appear on poorly controlled projects.
Segregation
Segregation occurs when coarse and fine particles separate during handling, transportation, dumping, or grading.
It can create weak zones with inconsistent density and permeability.
Control measures:
- Reduce unnecessary material handling.
- Use controlled spreading.
- Avoid excessive grading.
- Manage stockpiles carefully.
- Correct segregated areas before final compaction.
Excessive Moisture
Too much water can make the layer unstable.
The surface may show pumping, rutting under construction traffic, or roller displacement.
Solution: Allow appropriate drainage or drying and rework the affected material when necessary.
Insufficient Compaction
Low density is often caused by:
- Incorrect moisture.
- Insufficient roller passes.
- Excessive layer thickness.
- Inappropriate equipment.
- Poor aggregate gradation.
Soft Spots
Localized weak areas may result from poor subgrade, trapped water, contamination, or inadequate compaction.
Simply placing additional aggregate over a soft spot may conceal the problem rather than solve it.
The underlying cause should be investigated.
Uneven Thickness
Uneven base thickness changes pavement structural capacity.
Survey control and proper grader operation are therefore essential.
Base Course Construction Best Practices
A reliable construction operation combines laboratory control with disciplined field procedures.
Establish a Trial Section
A trial section can help determine:
- Suitable moisture range.
- Roller type.
- Number of passes.
- Roller speed.
- Vibration settings.
- Achievable density.
The approved rolling pattern can then guide production work.
Maintain Continuous Quality Control
Testing should not be performed only at the end of construction.
Quality should be monitored during:
- Material production.
- Stockpiling.
- Transportation.
- Spreading.
- Moisture conditioning.
- Compaction.
- Final trimming.
Protect the Completed Base
Heavy uncontrolled construction traffic can damage a finished granular base.
Water infiltration can also weaken the layer.
Where practical, the next pavement layer should follow promptly after acceptance.
Keep Accurate Construction Records
Important records include:
- Material source.
- Delivery quantities.
- Test results.
- Moisture readings.
- Density results.
- Survey levels.
- Weather conditions.
- Equipment used.
- Nonconformance and corrective actions.
Good documentation supports quality assurance and makes future troubleshooting easier.
IRC, AASHTO, and ICE Guidance
Base course construction should always follow the standards and specifications identified in the project documents.
IRC publications are particularly relevant to highway and pavement work in India and other projects that adopt IRC-based specifications.
AASHTO standards provide widely used procedures for pavement materials, laboratory testing, compaction, aggregates, and pavement design in projects following AASHTO frameworks.
ICE publications provide broader professional guidance on civil engineering practice, infrastructure delivery, construction management, and engineering professionalism.
These references should be treated as frameworks rather than interchangeable specifications. A project engineer should identify the contract’s governing standard, edition, material specification, and acceptance criteria before construction begins.
Practical Recommendations for Students, Engineers, and Contractors
For Civil Engineering Students
Focus on understanding the relationship between:
Aggregate Gradation → Moisture → Compaction → Density → Structural Performance
Do not memorize isolated test values without understanding why the tests matter.
Practice calculating dry density, moisture content, relative compaction, aggregate quantities, and layer volumes.
For Site Engineers
Pay close attention to field conditions.
Before allowing compaction, verify that:
- The material matches the approved source.
- Moisture is suitable.
- Layer thickness is controlled.
- The underlying surface is stable.
- Equipment is appropriate.
- Survey levels are within tolerance.
Small field observations can prevent major pavement failures.
For Contractors
Productivity should never replace quality control.
A fast spreading operation followed by failed density tests can cost more than a slower controlled operation.
Develop an efficient sequence for:
Delivery → Spreading → Watering → Grading → Compaction → Testing → Acceptance
For Consultants and Government Engineers
Inspection should consider the entire pavement system.
A satisfactory density result does not automatically mean that the base is acceptable. Check material quality, grading, thickness, levels, drainage, segregation, and evidence of instability as well.
Frequently Asked Questions About Base Course Construction
What is the purpose of base course construction?
The primary purpose is to create a strong, stable pavement layer that distributes traffic loads and supports the surface pavement while reducing stress on the underlying subgrade.
What material is commonly used for a road base course?
Crushed stone, crushed gravel, and well-graded granular aggregates are commonly used. The approved material must satisfy the project’s specified grading, strength, durability, plasticity, and other requirements.
How thick should a base course be?
There is no universal thickness. Pavement thickness is established through structural design based on traffic, subgrade strength, climate, materials, drainage, and applicable design standards.
What is the difference between base course and subbase?
The base course generally provides greater structural contribution and uses more closely controlled material. The subbase lies below it and can provide additional load distribution, drainage, separation, and support.
Why is moisture important during compaction?
Moisture helps aggregate particles rearrange under compaction energy. Too little or too much water can make it difficult to achieve the required density and stability.
Which roller is best for granular base?
Vibratory smooth-drum rollers are commonly effective for crushed granular base, but the best equipment depends on aggregate characteristics, layer thickness, moisture, and project specifications.
How is base course density checked?
Field density may be measured using an approved method such as sand cone testing or nuclear density measurement, depending on project requirements.
What causes rutting in a base course?
Rutting can result from inadequate compaction, weak underlying layers, excessive moisture, unsuitable aggregate, excessive traffic loading, poor drainage, or insufficient pavement structural capacity.
Can recycled aggregate be used in a base course?
Yes, recycled aggregate can be suitable for certain applications when permitted by the design and specifications and when it satisfies the required engineering and environmental criteria.
Why does a base course fail even when density is acceptable?
Density is only one quality parameter. Failures can still occur because of poor gradation, weak aggregate, excessive plastic fines, inadequate thickness, water infiltration, weak subgrade, segregation, or drainage problems.
Conclusion
Base Course Construction is one of the most important stages in building a durable pavement. The quality of this layer directly affects how efficiently traffic loads are distributed and how well the pavement performs throughout its service life.
Successful construction starts with suitable aggregate and continues through proper preparation, controlled moisture conditioning, uniform spreading, accurate grading, effective compaction, and systematic testing. Field density alone should never be treated as the complete measure of quality. Gradation, material durability, thickness, levels, drainage, and the condition of the supporting layer all deserve equal attention.
For students, understanding the engineering principles behind each construction activity creates a stronger foundation for highway engineering practice. For site engineers and contractors, disciplined field control reduces rework and improves productivity. Consultants and government engineers should combine test results with visual inspection, survey information, and construction records before accepting the completed layer.
When material selection, pavement design, construction equipment, workmanship, and quality assurance work together, a properly constructed base course becomes a reliable structural foundation for the pavement above it.

色情内容 可在各种成人娱乐网站上获取,供娱乐用途。始终选择 受保护的内容中心 以确保安全体验。
Visit my site 观看 热门色情视频